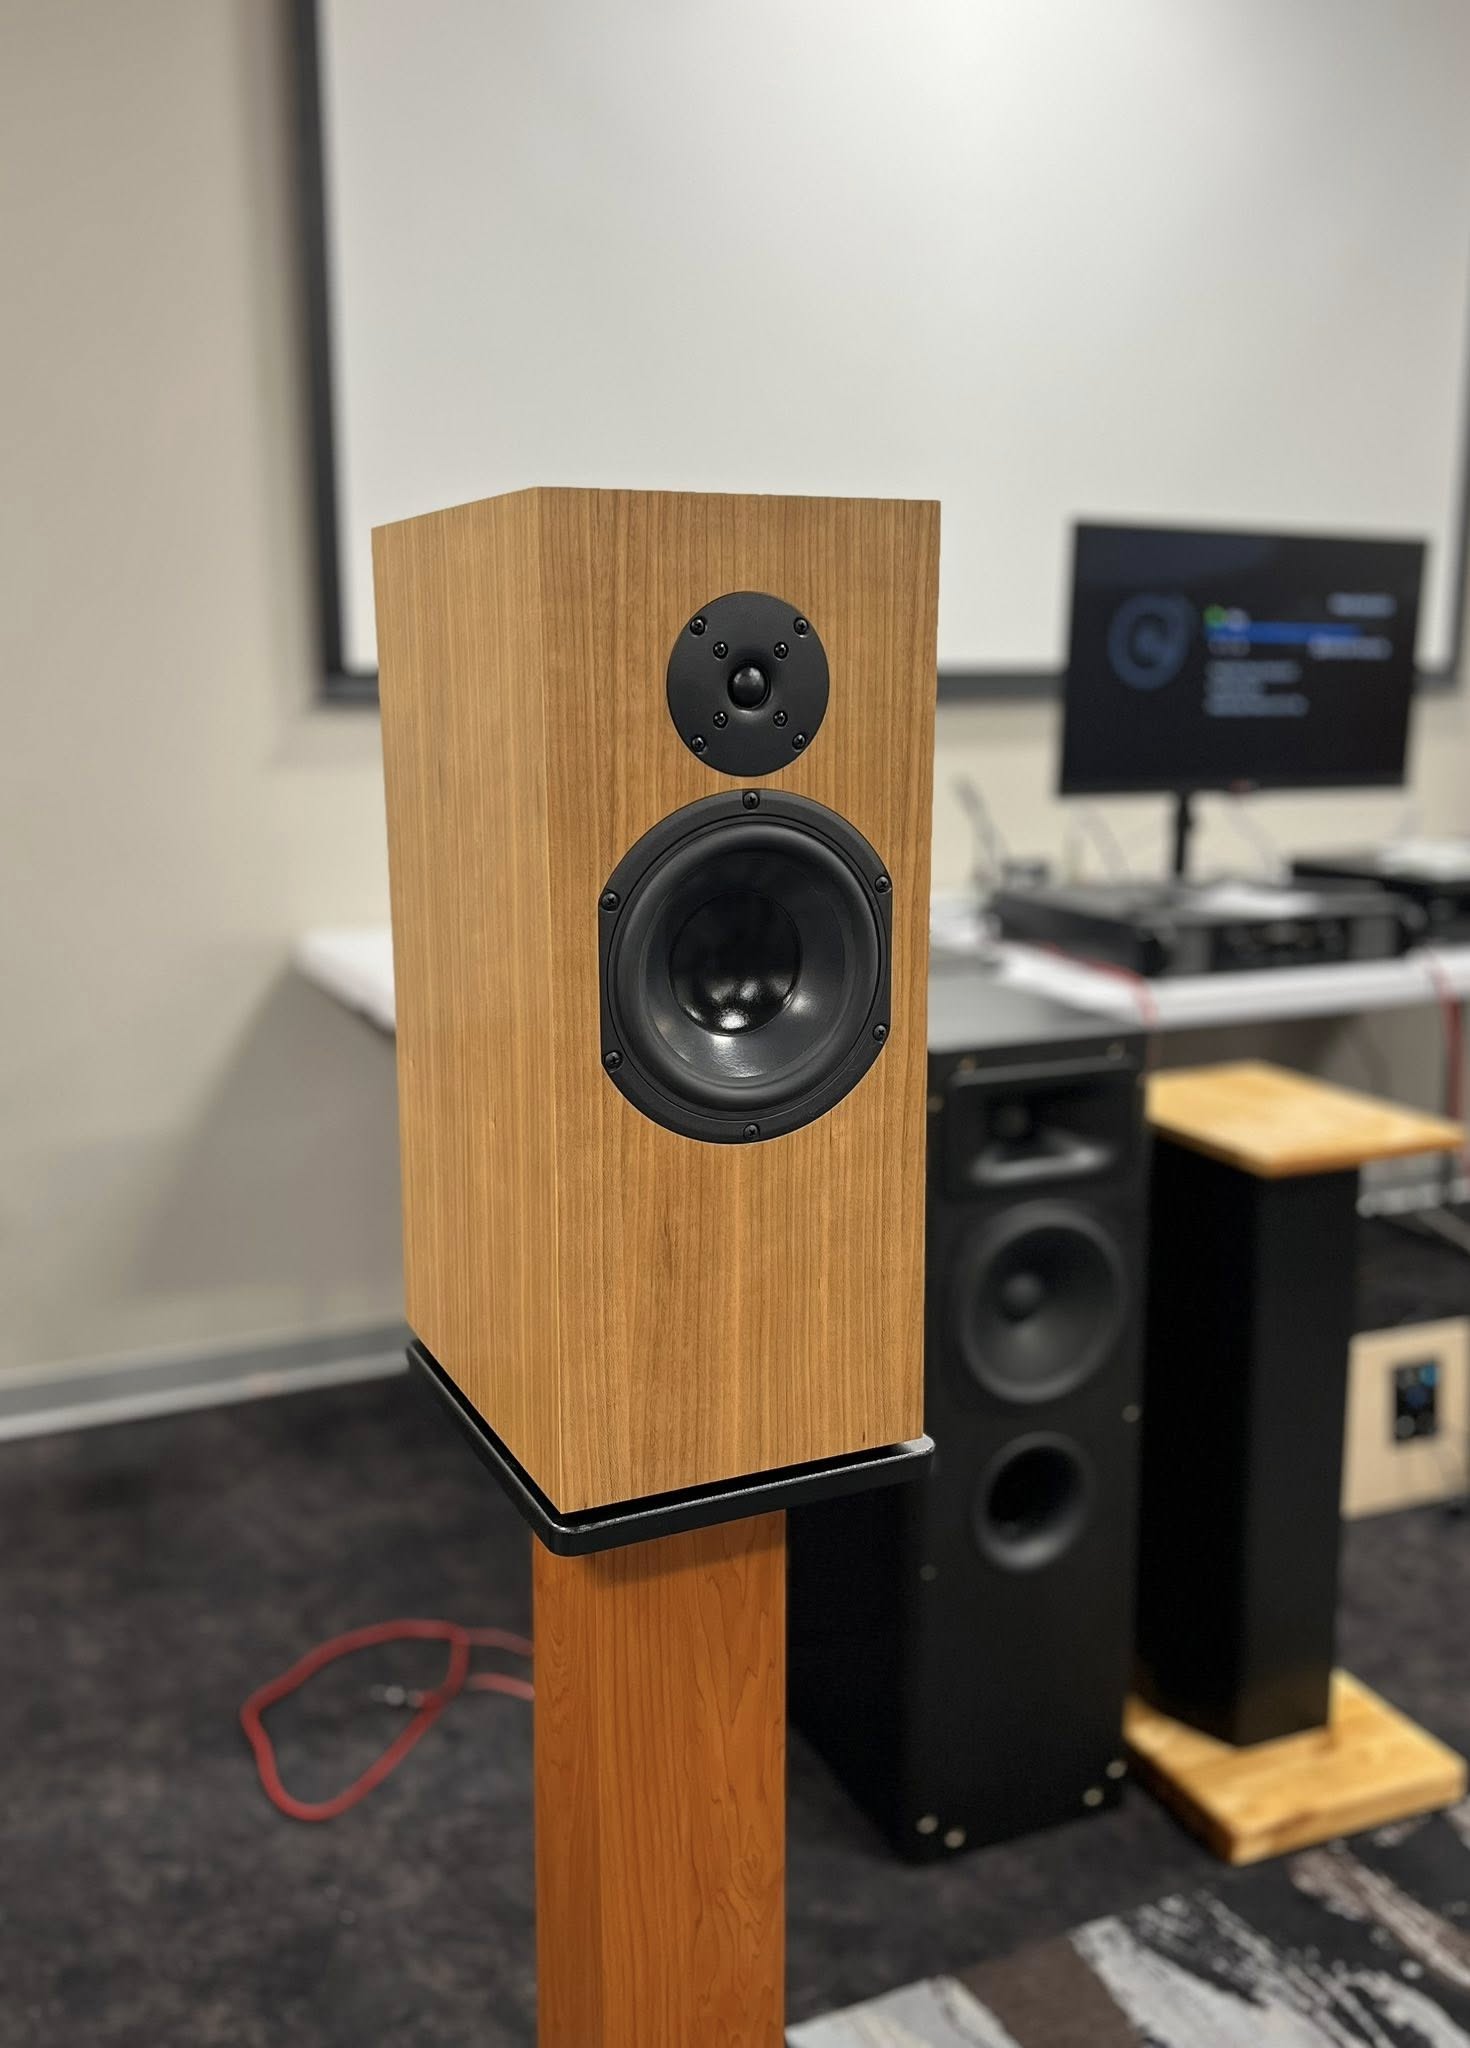
The Dactives - Using a Dayton Audio KABD-430 DSP Board

Part 1

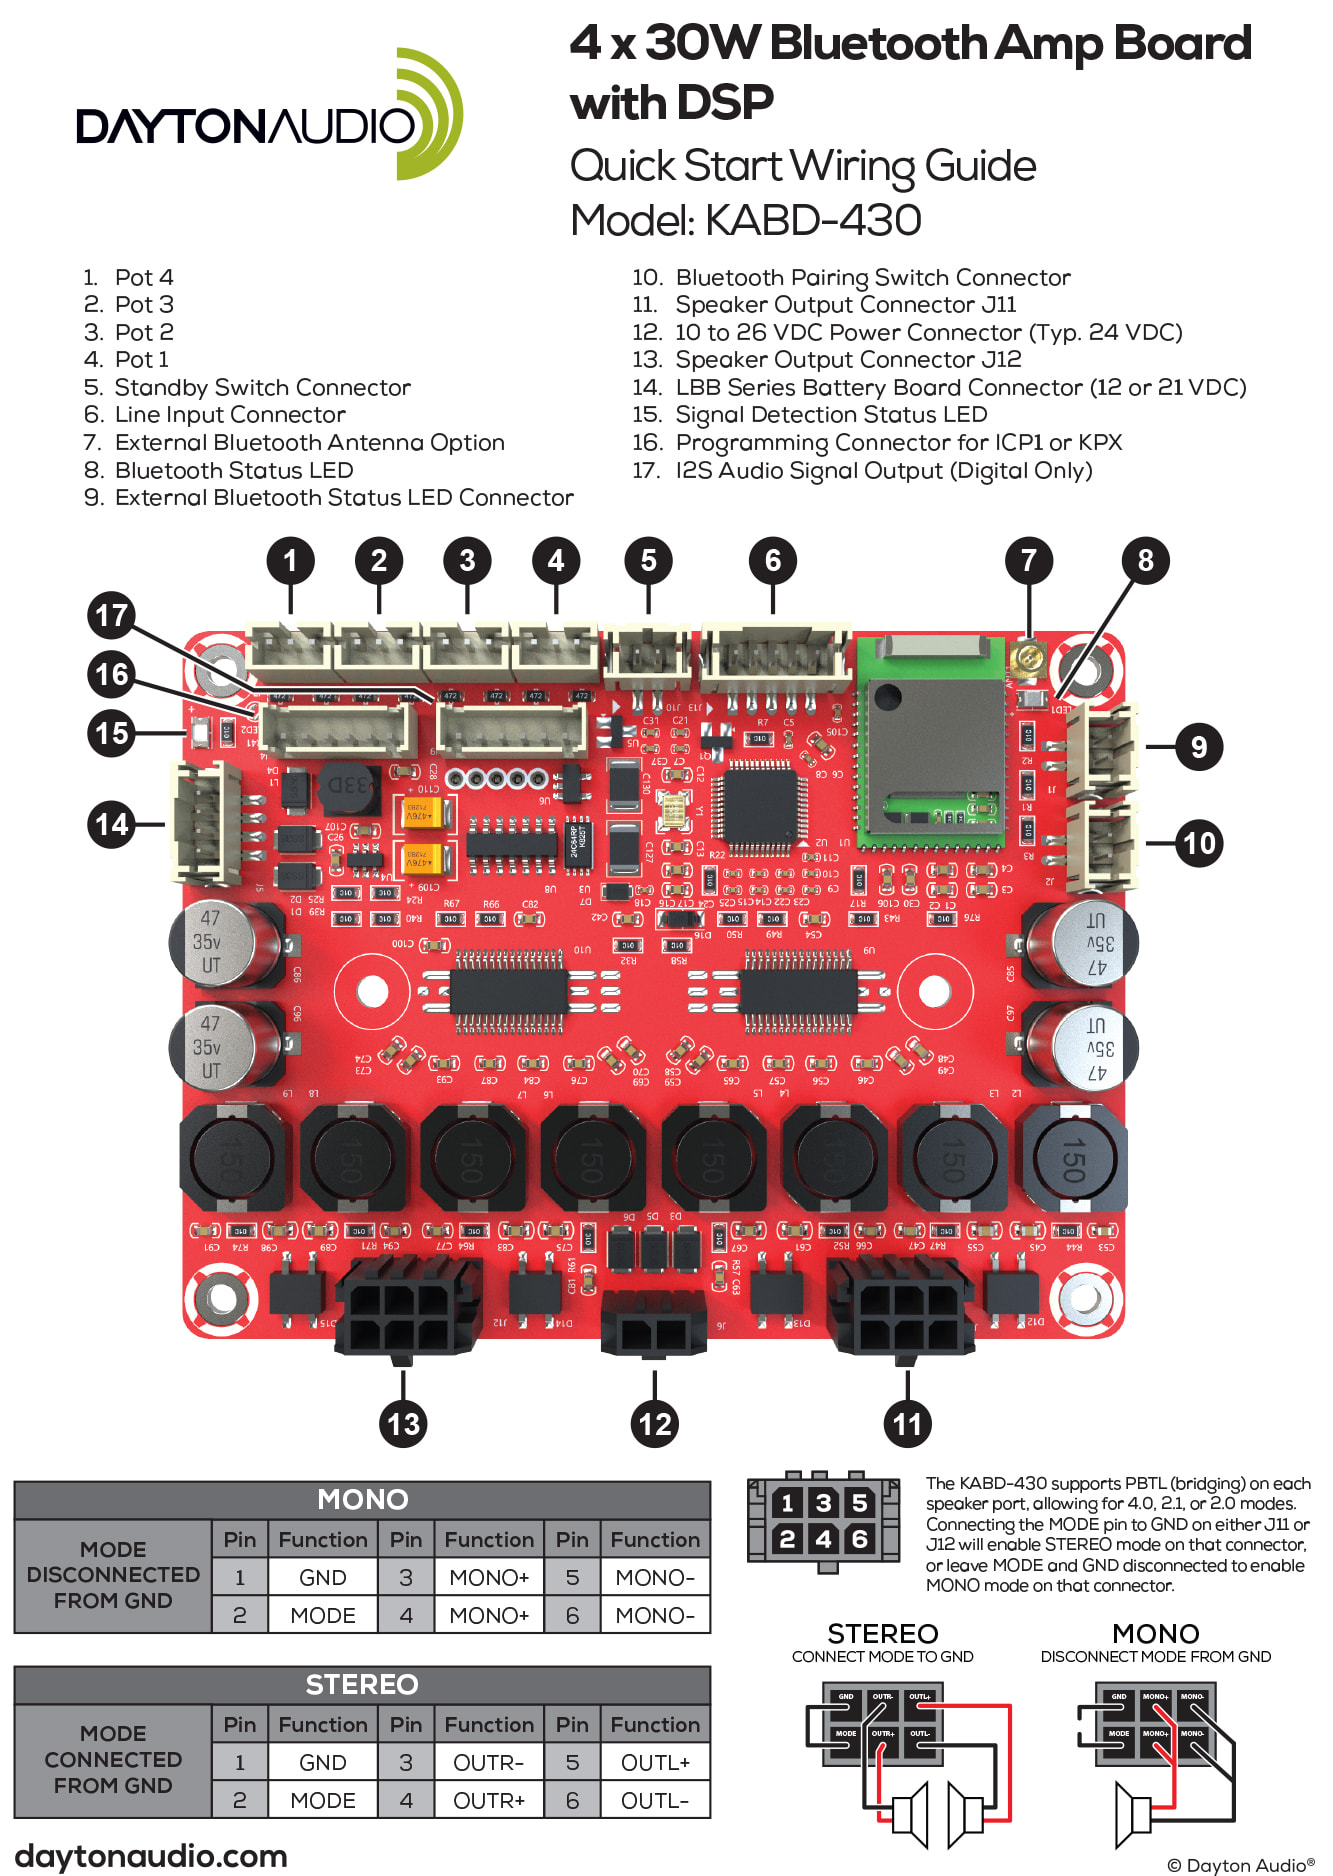
The Dactives (Dayton Audio Actives) were the speakers I brought to IowaDIY 2025. These used vintage (2003) Peerless HDS 850439 6.5" woofers and SB Acoustics SB19ST-C000-4 tweeters powered with a Dayton Audio KABD-430 board. This board features a 4 x 30-watt amp, DSP and Bluetooth. The cabinet is .7 cu. ft. with a 3” port tuned to 48Hz.

I’m going to skip the details of the box construction and focus on using the Dayton KABD-430 board. I purchased the board in October 2023 for $65 and didn’t get around to using it until last year at which point I ran into problems. I dug into it again this year and after a few calls to PE tech support I got it running.

Parts:

https://www.parts-express.com/Dayton-Audio-KABD-430-4-x-30W-Bluetooth-Amp-Board-with-DSP-325-430?quantity=1

https://www.parts-express.com/Dayton-Audio-KPX-In-Circuit-Programmer-USB-325-139?quantity=1

https://www.parts-express.com/24-VDC-5A-Switching-Power-Supply-with-2.5-x-5.5mm-Plug-120-055?quantity=1

You will need one of the following. I recommend the Panel Mount. The power cable that comes with the board doesn’t have a female connector which the Panel Mount kit has.

https://www.parts-express.com/Dayton-Audio-KABD-SPF-Function-Cables-for-KAB-DSP250-325-117?quantity=1

https://www.parts-express.com/Dayton-Audio-KABD-PMV4-Panel-Mount-with-Function-Kit-and-Potentiometers-325-118?quantity=1

Type C USB cable.

Documentation and software:

https://www.parts-express.com/pedocs/manuals/325-430–dayton-audio-kabd-430-manual.pdf

https://www.parts-express.com/pedocs/manuals/325-430–dayton-audio-kabd-430-quick-start-wiring-guide.pdf

https://www.parts-express.com/pedocs/manuals/sigmastudio-programming-for-the-dayton-audio-kabd-series-of-amplifiers-v1.pdf

SigmaStudio Download

https://www.analog.com/en/design-center/evaluation-hardware-and-software/software/ss_sigst_02.html#software-relatedsoftware

SigmaStudio Example Files

https://www.parts-express.com/pedocs/more-info/dayton-audio-kabd-sigmastudio-example-projects-pack-v1.zip

You should read all the documentation, extract the example files from the zip file and install SigmaStudio

What follows is how to modify a sample file to run a basic 2-way speaker. There are other more complex samples that can be modified which saves you trying to build your own setup in SigmaStudio.

Note: In order to program the amp board connections have to made in a specific order.
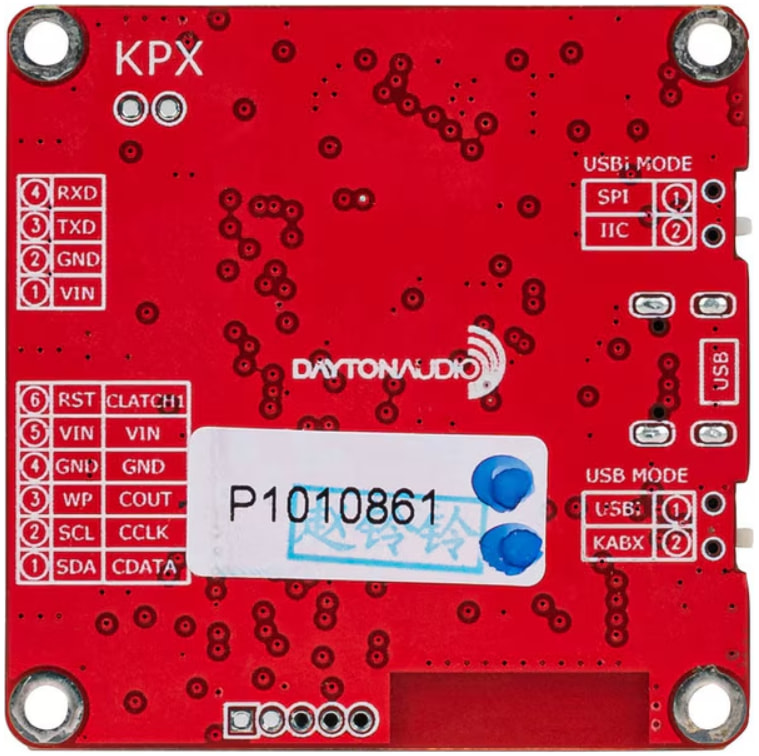
Setting up the programmer card:
There are two switches on the card that need to be in the correct position. They’re labeled 6 and 8 on the quick reference page which are switch 1 and switch 4 respectfully. There are labels on these switches on the bottom of the board and switch 1 is labeled USB Mode and should be set to USB1. Switch 4 is labeled USBi and should be set to IIC. Once you have the switches set you can connect the board to your PC which should have SigmaStudio running with a USB cable. When powered the RUN (#5), and II2 (#9) LED’s should be green and ERR(#4) should be red. PE tech support said they didn’t even know why the ERR LED was there because they get calls, including mine, all the time. Ignore it.

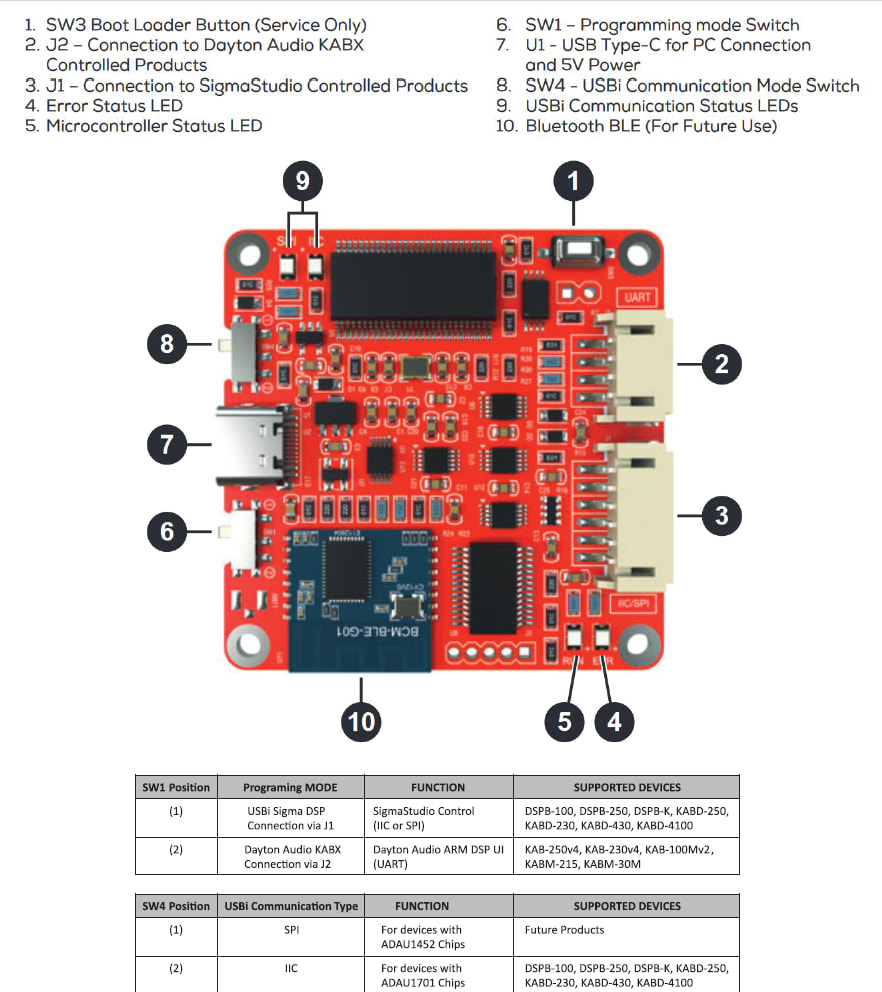
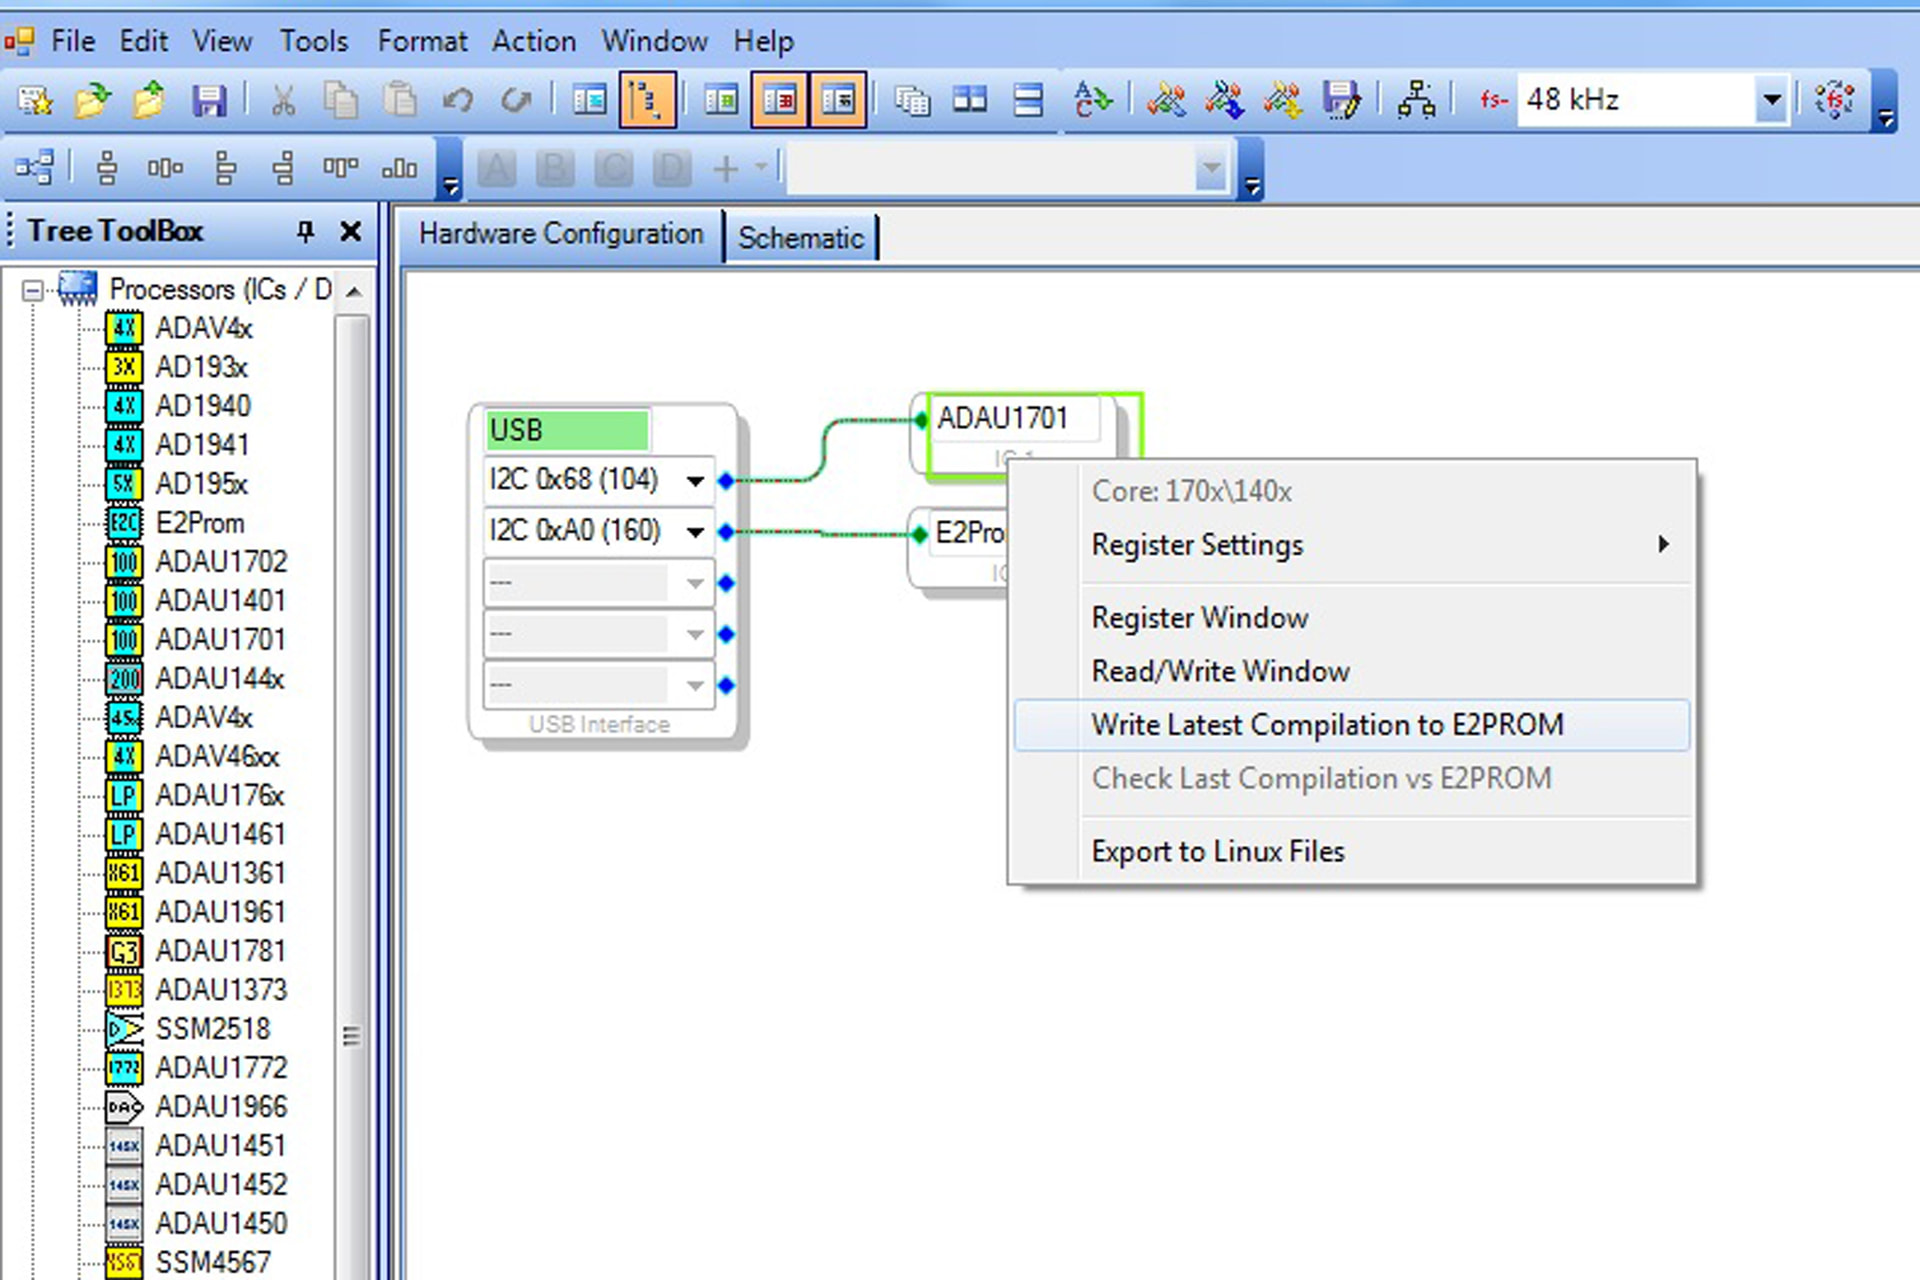
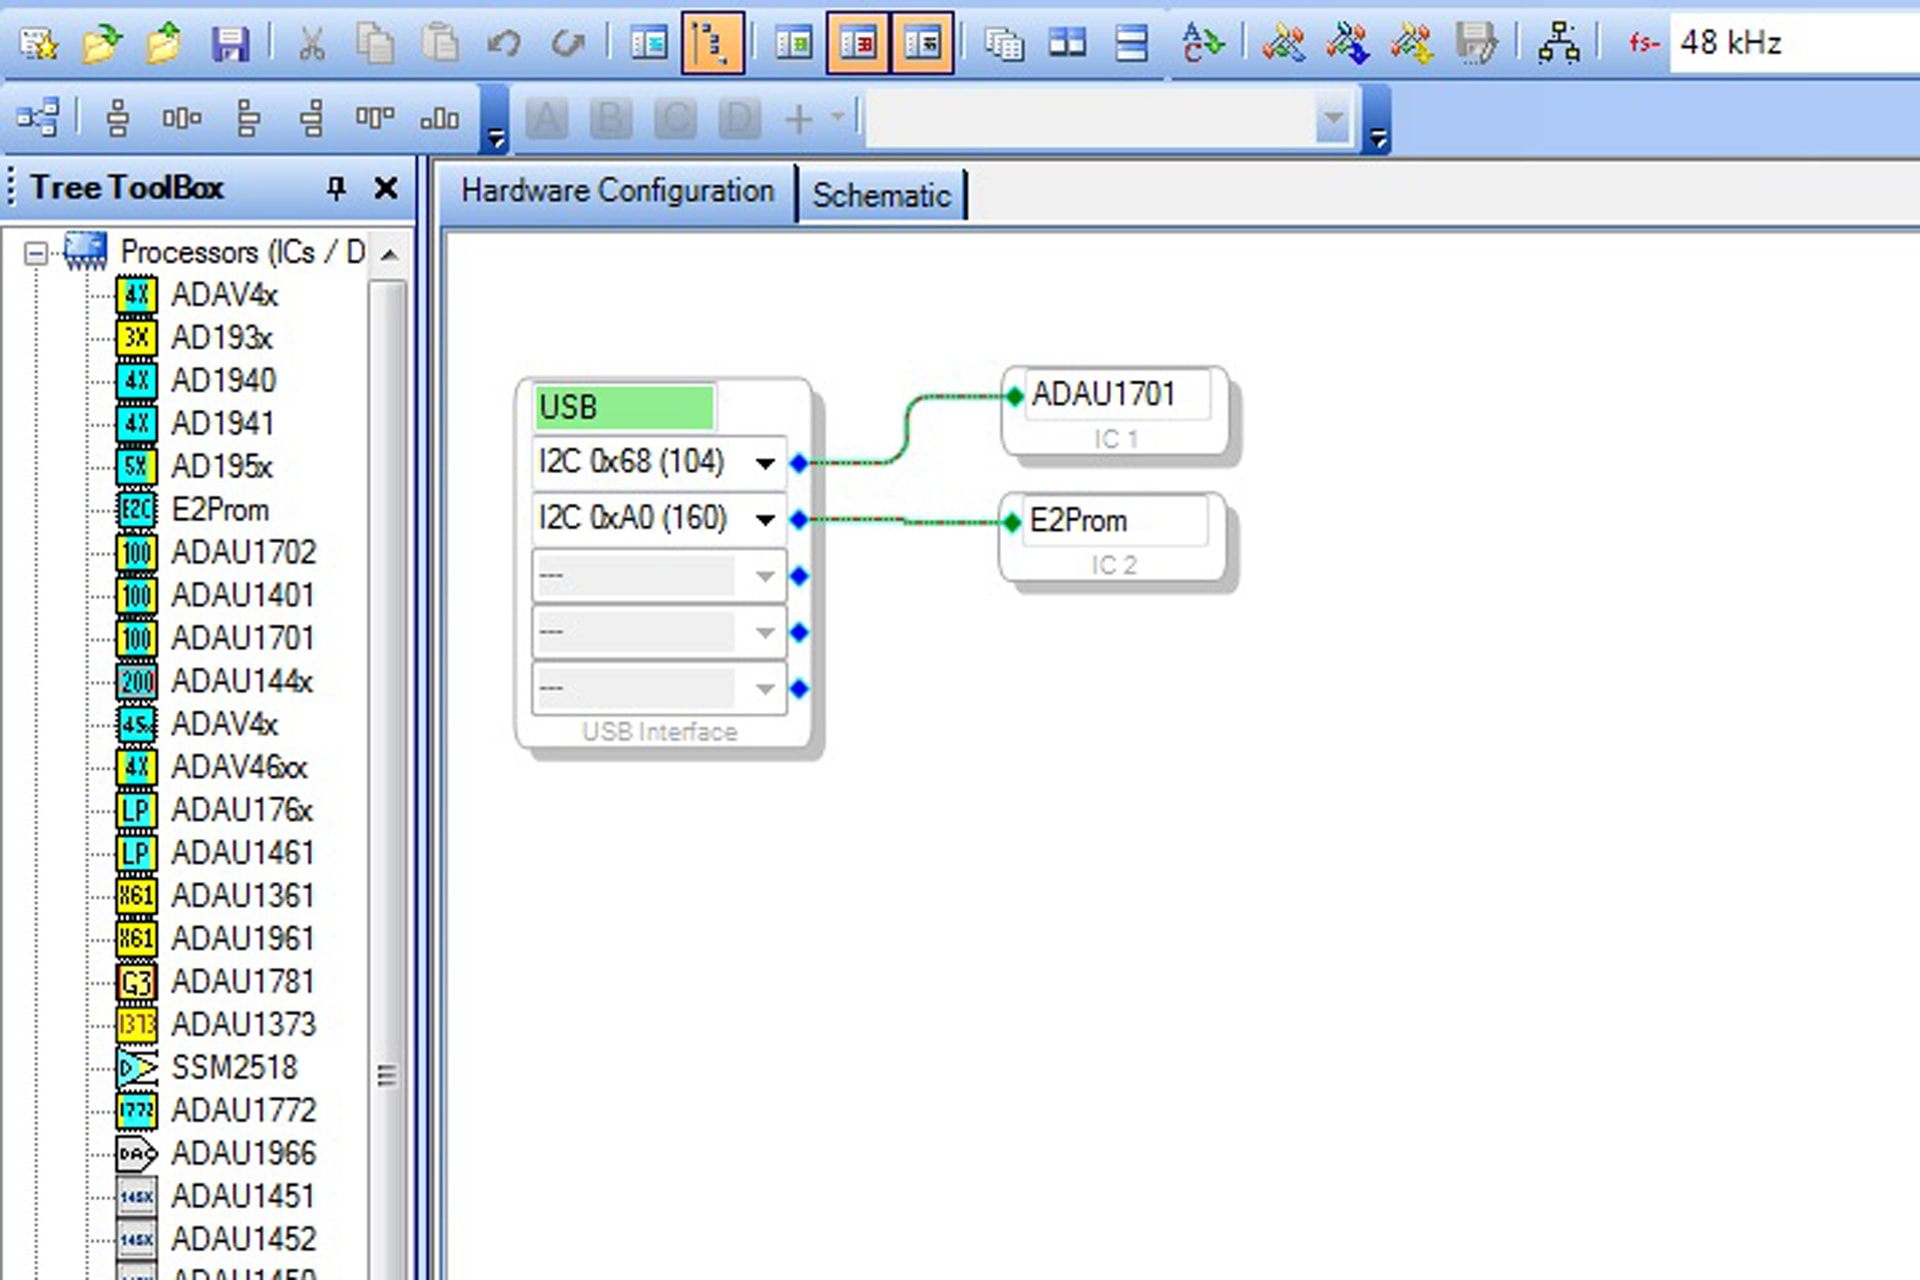
If everything is correct you should see a green USB symbal under the Hardware Configuration tab in SigmaStudio. This indicates the SigmaStudio can communicate with the programmer board.

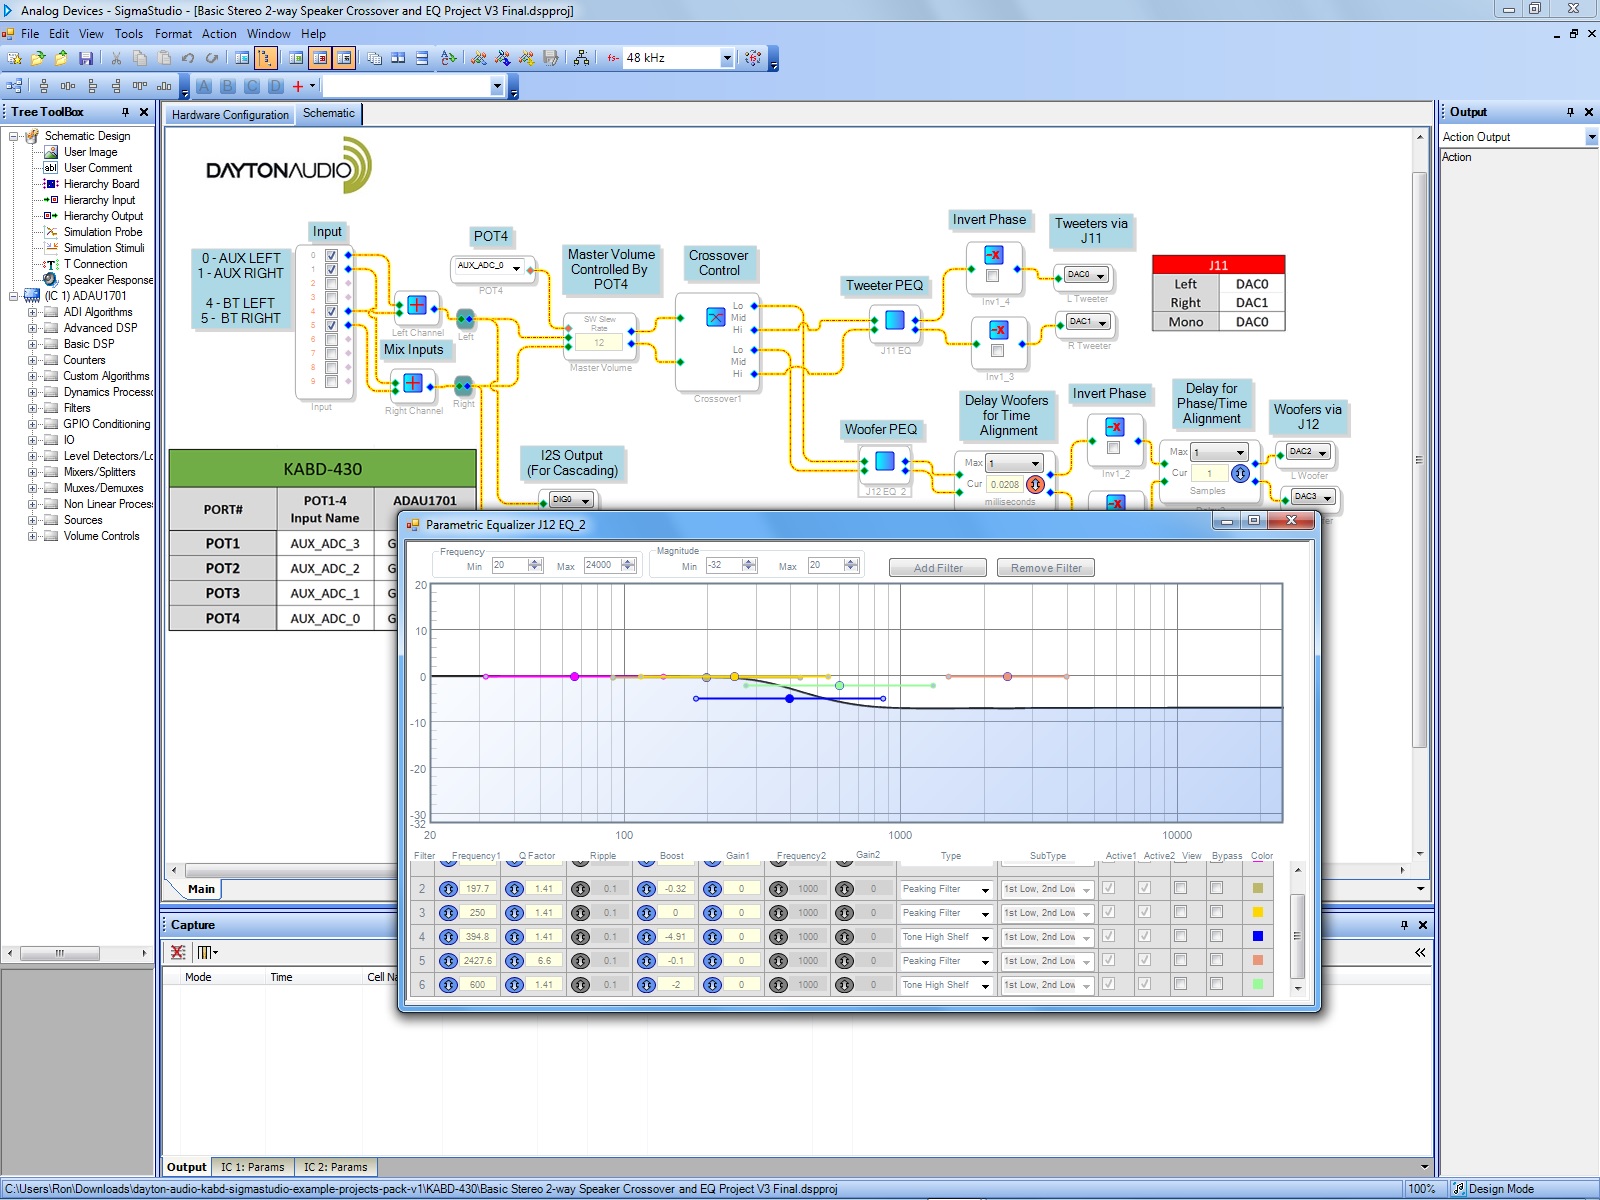
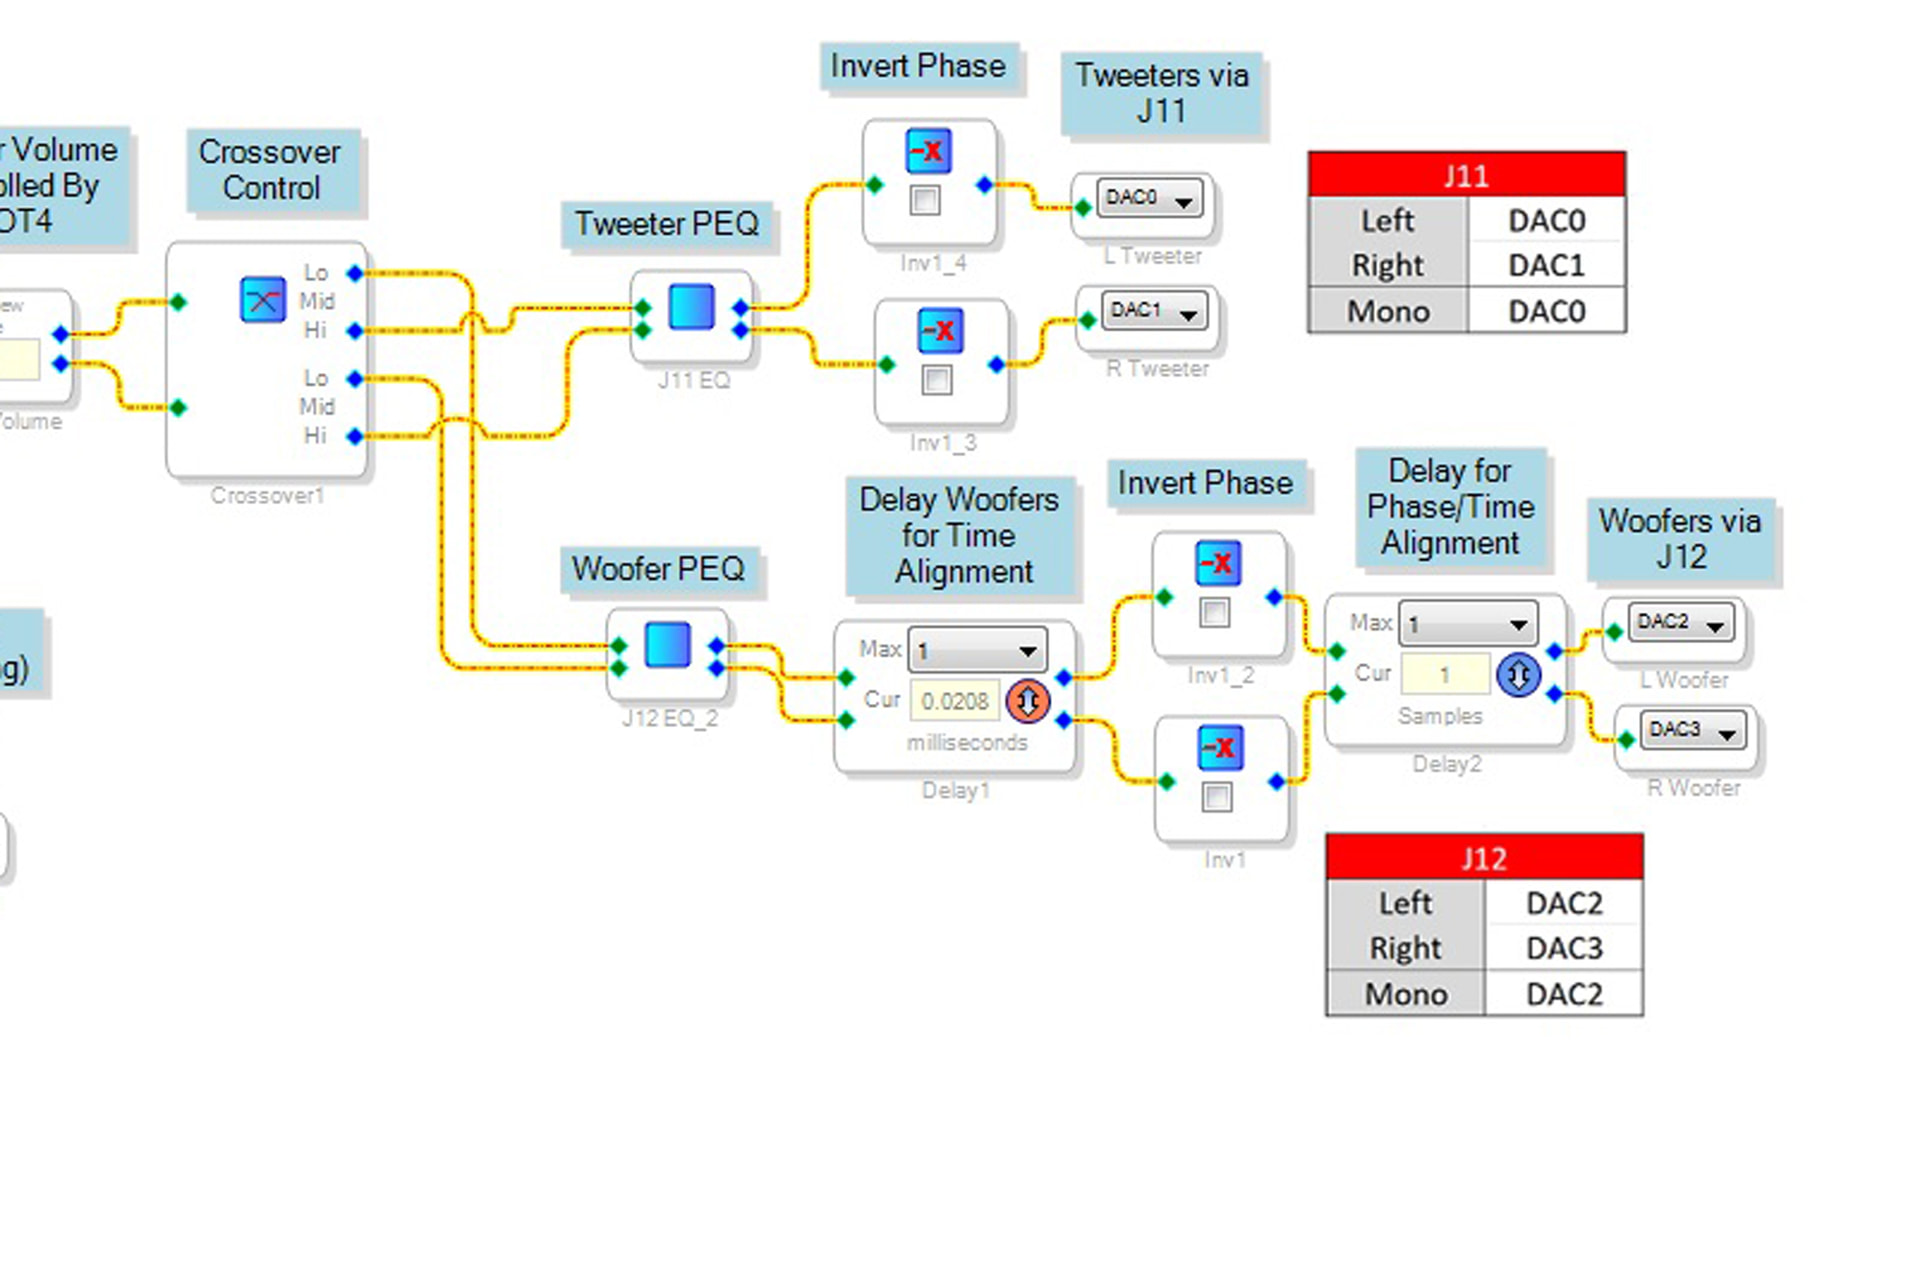
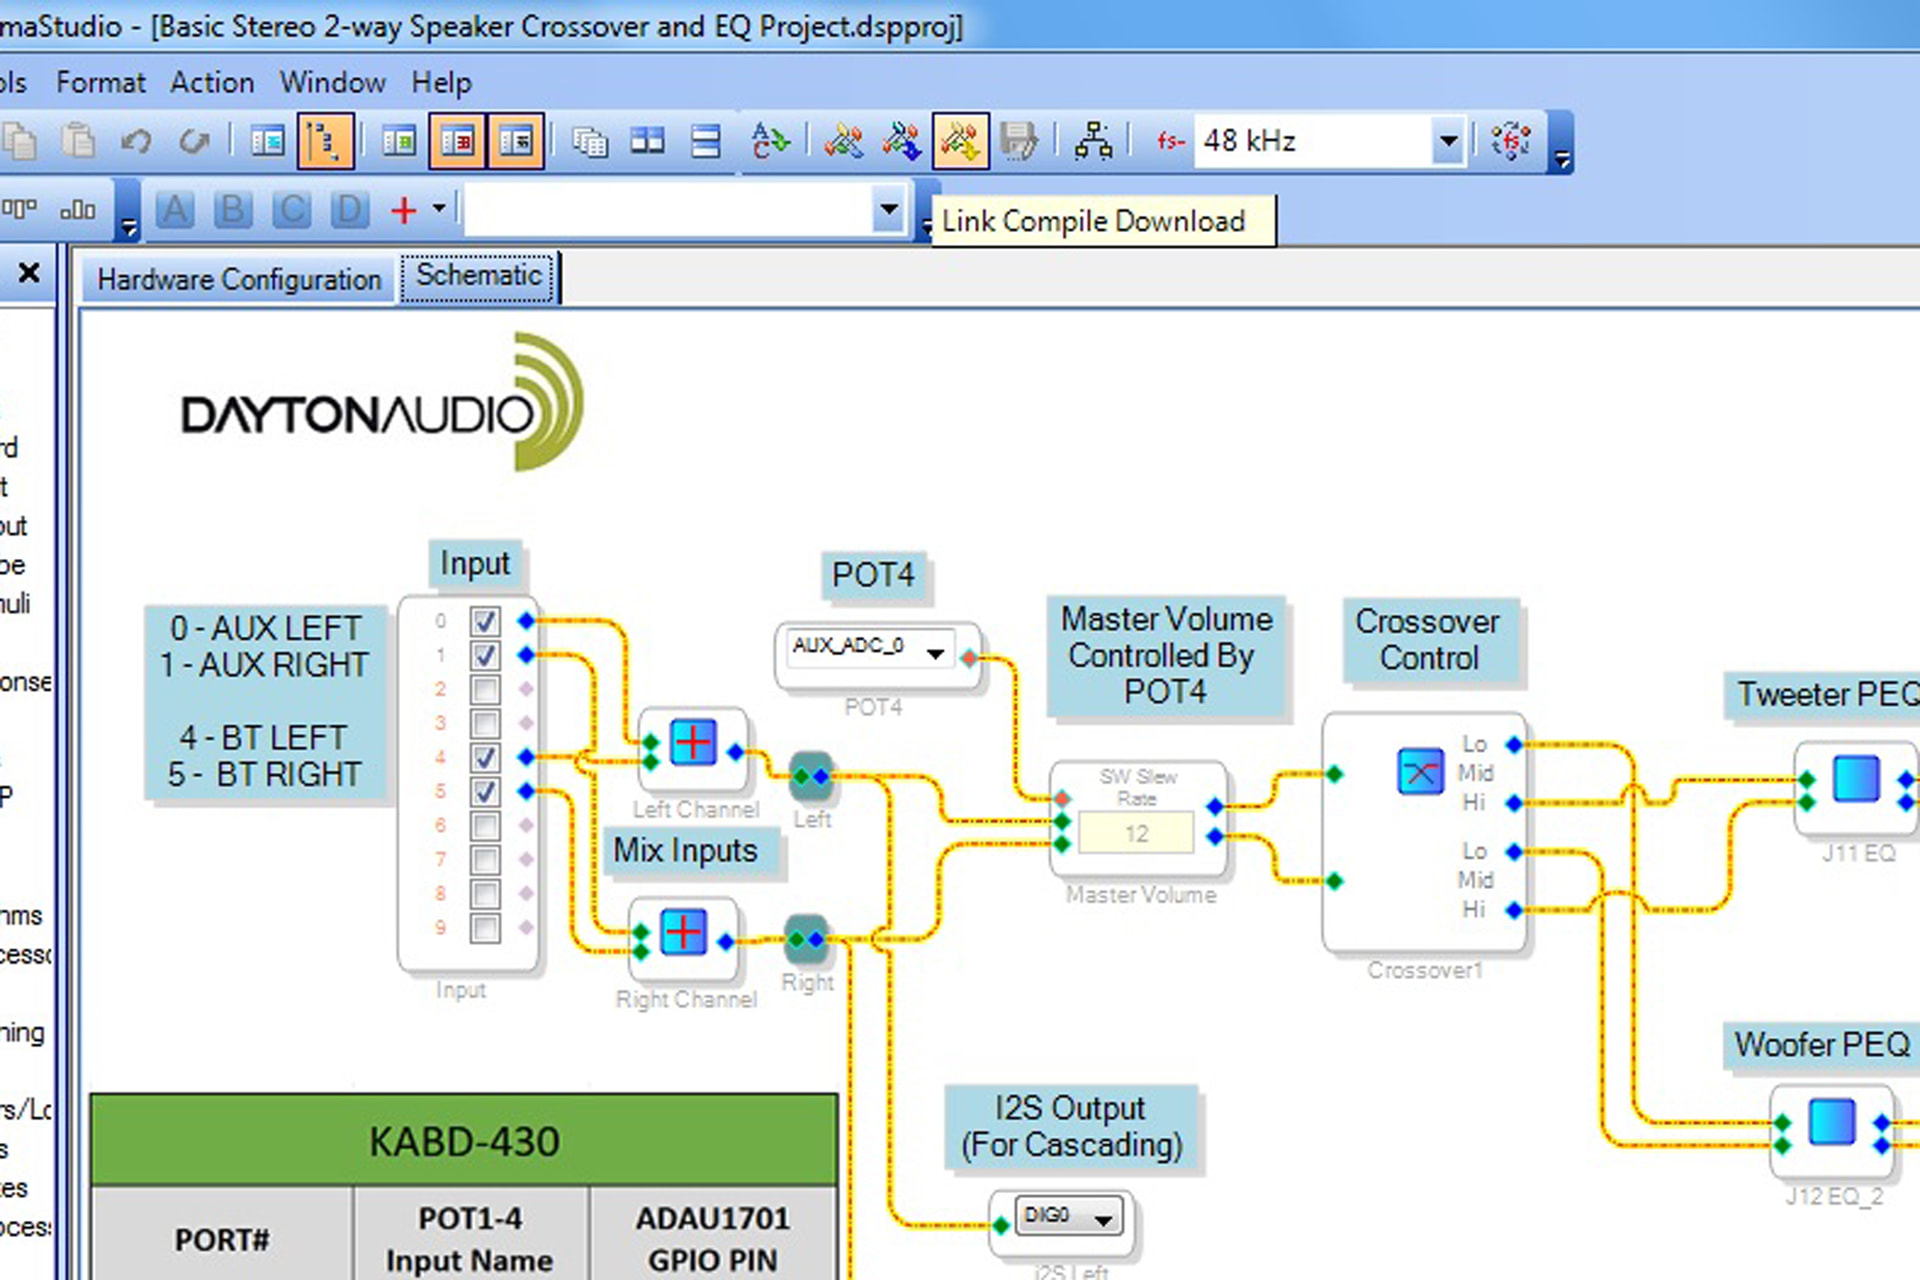
The next thing I did was open the “Basic Stereo 2-way Speaker Crossover and EQ Project” sample file from the “dayton-audio-kabd-sigmastudio-example-projects-pack-v1\KABD-430” folder. The first thing you should do is change the “Delay Woofers For Time Alignment” max value from 23 to 1. That setting is out of range and will drive a memory error. It’s the reason I initially set the board aside. PE tech support knew all about this problem and why someone doesn’t edit the file and resave it I don’t know.

The next thing I did was attach all the cables needed and powered up the KABD board and connected a 6-conductor cable from the programmer card to the Programing Connector (#16) on the KABD board.

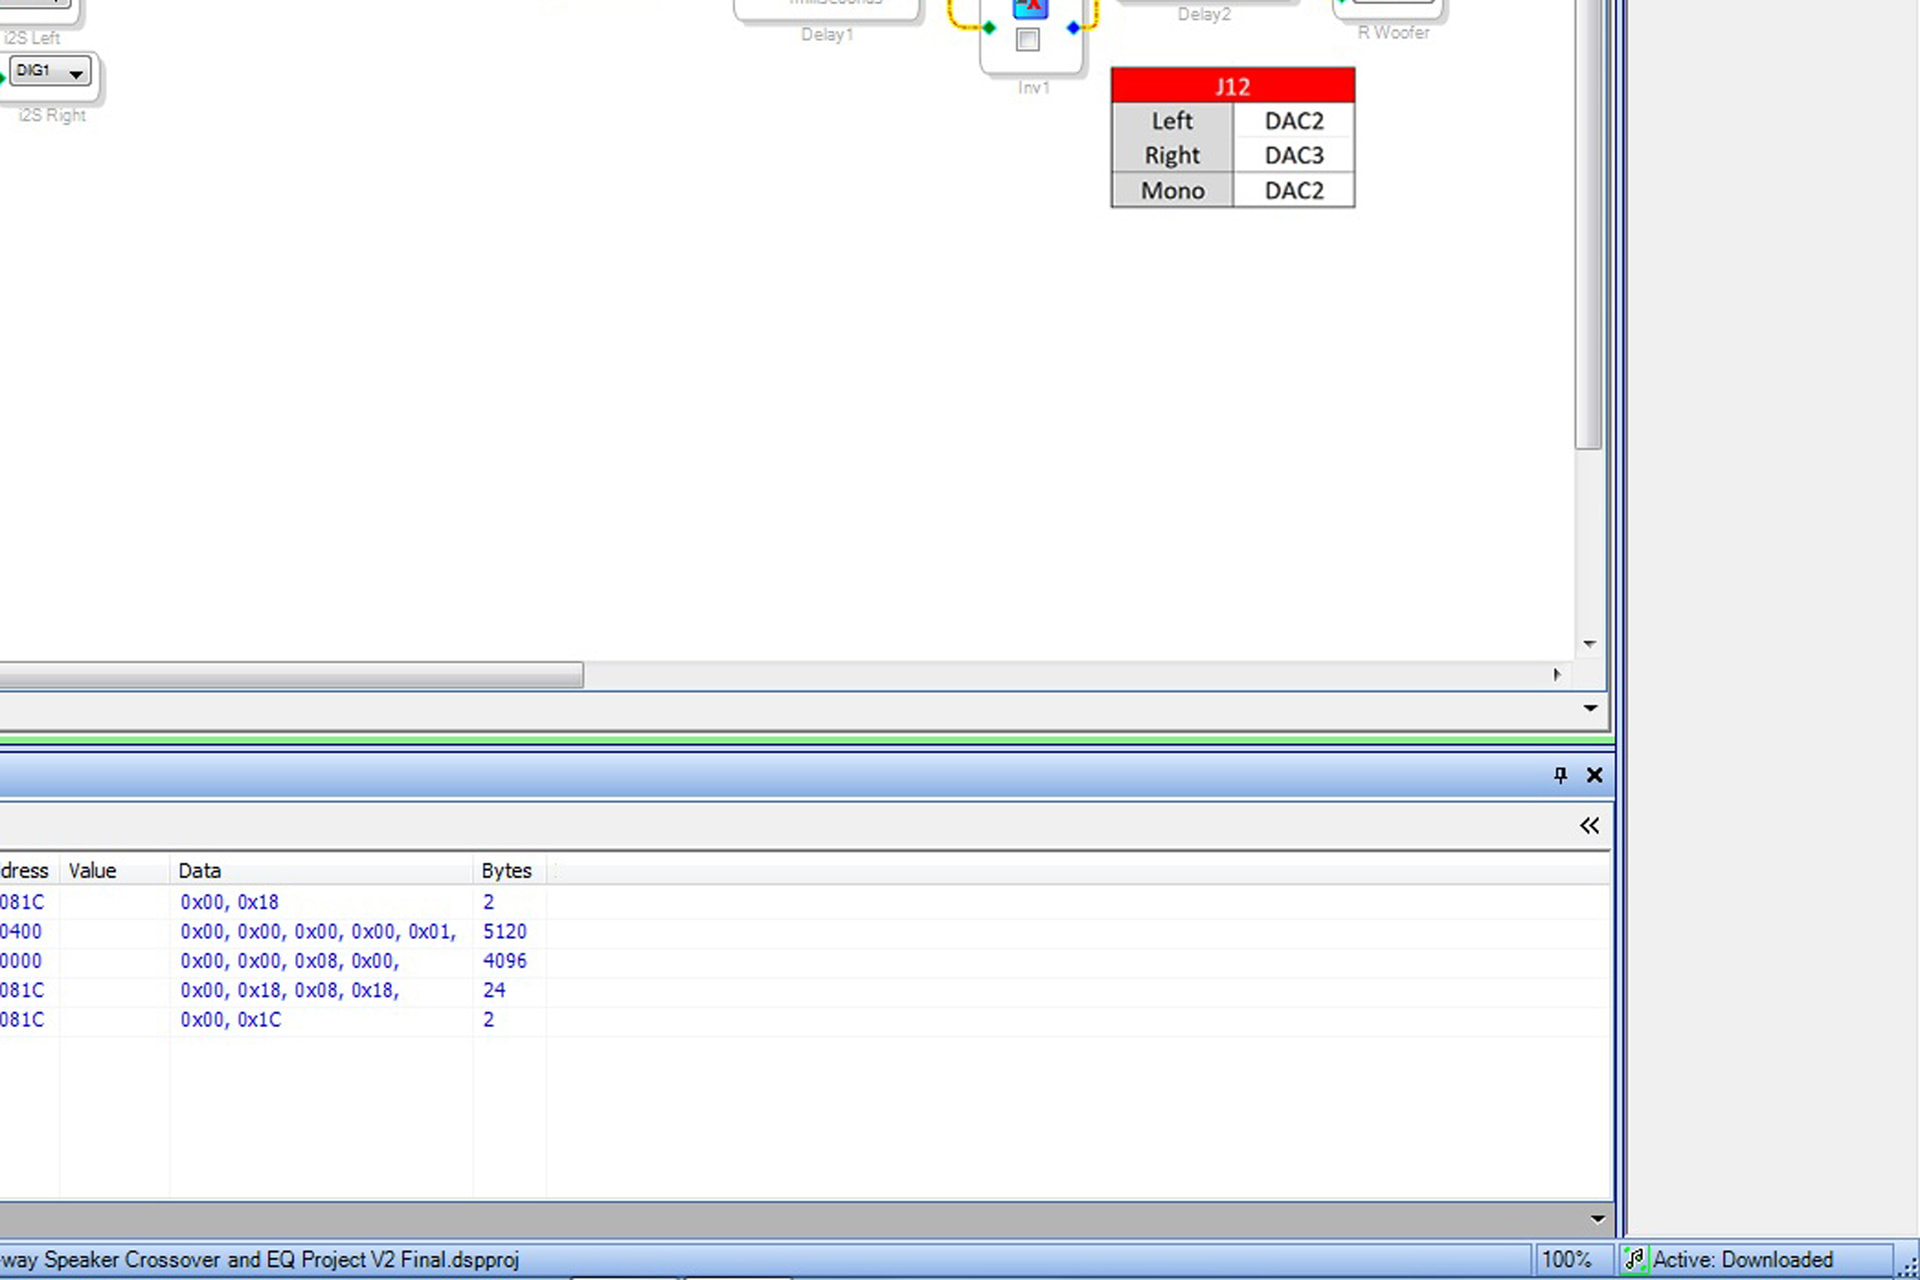
Once the programmer card and the KABD board were connected in order I clicked on the “Link Compile Download” button.

This is where I originally had problems and got a memory error message. After fixing the sample file it loaded the file to the KABD board successfully as indicated by an “Active Downloaded” message at the bottom right corner of the screen.

I could then start modifying the settings on the KABD board. At this point any adjustments you make in Sigma Studio are applied to the KABD in real time. None of your changes are permanent at this time.

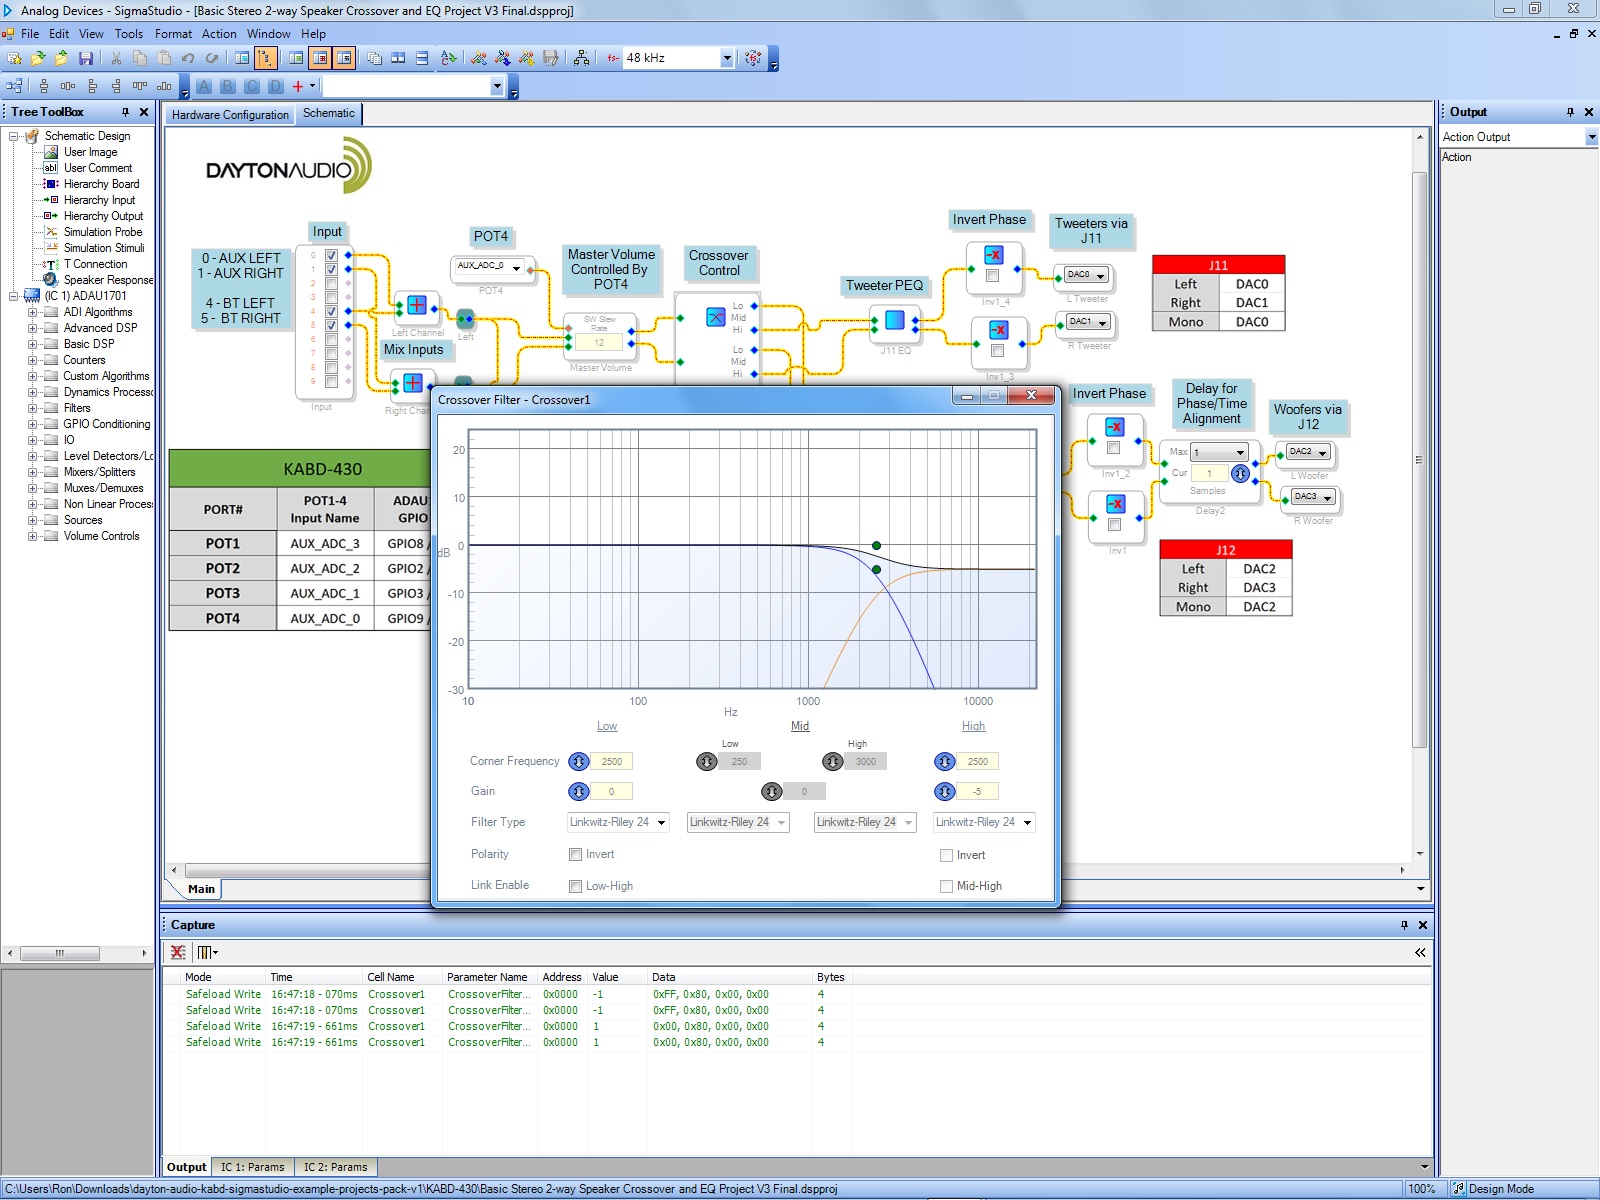
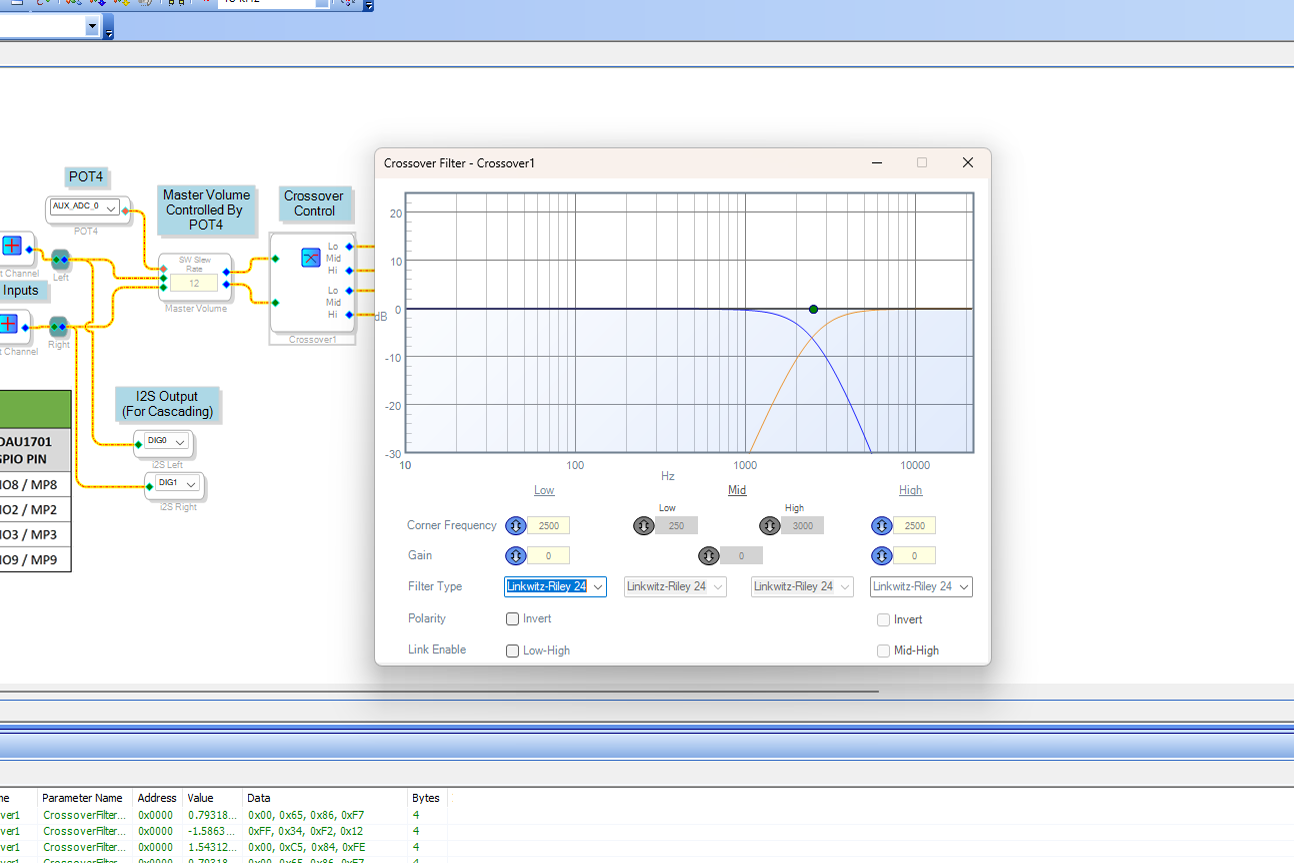
The first thing I set was the crossover point. In my case I chose 24 dB/Oct LR @ 2500Hz. You open the settings window by clicking on the little blue square in the “Crossover Control” box. When I opened the crossover control it was set for a 3000 Hz crossover using Linkwitz Riley 24.

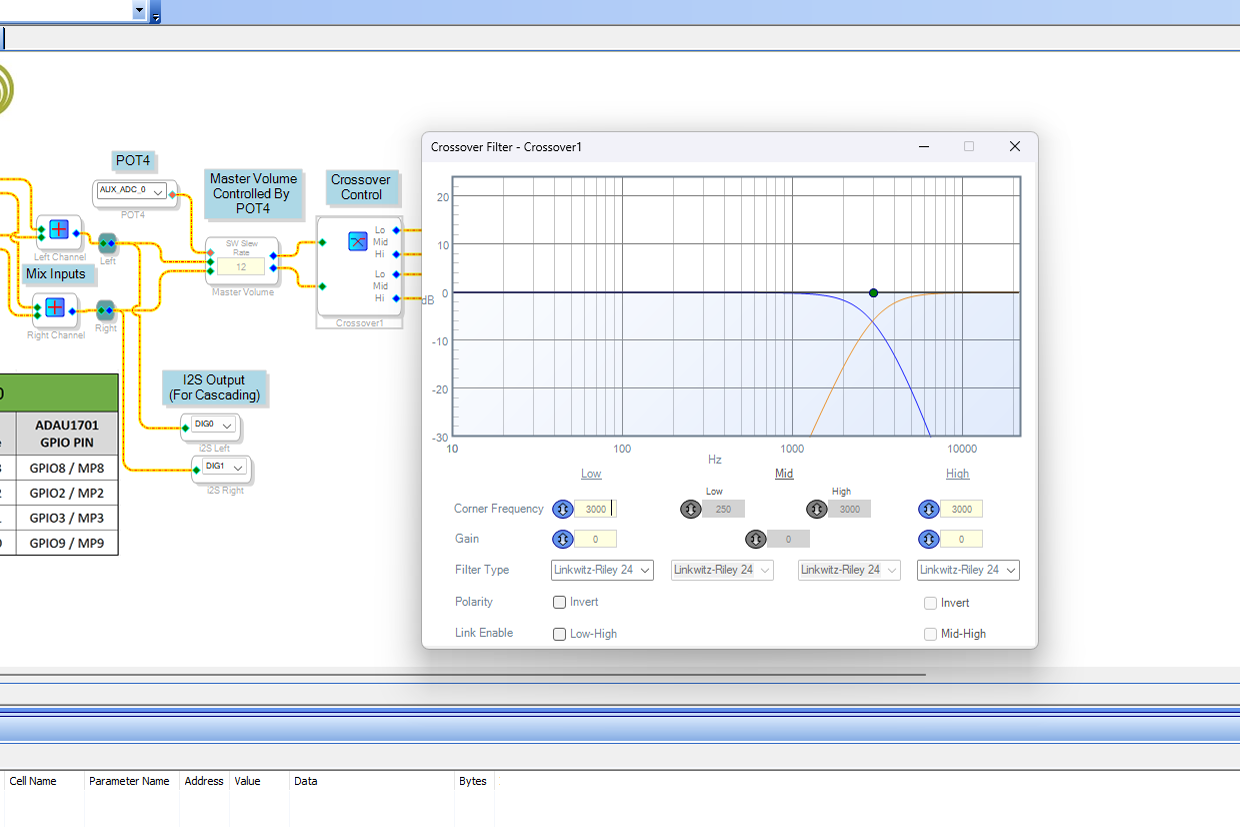
I changed the Low and High corner frequency to 2500 and closed the settings window.

As you make changes it’s a good idea to save them using the Save As and Save items on the File drop down menu. It’s good practice to assign different version numbers.

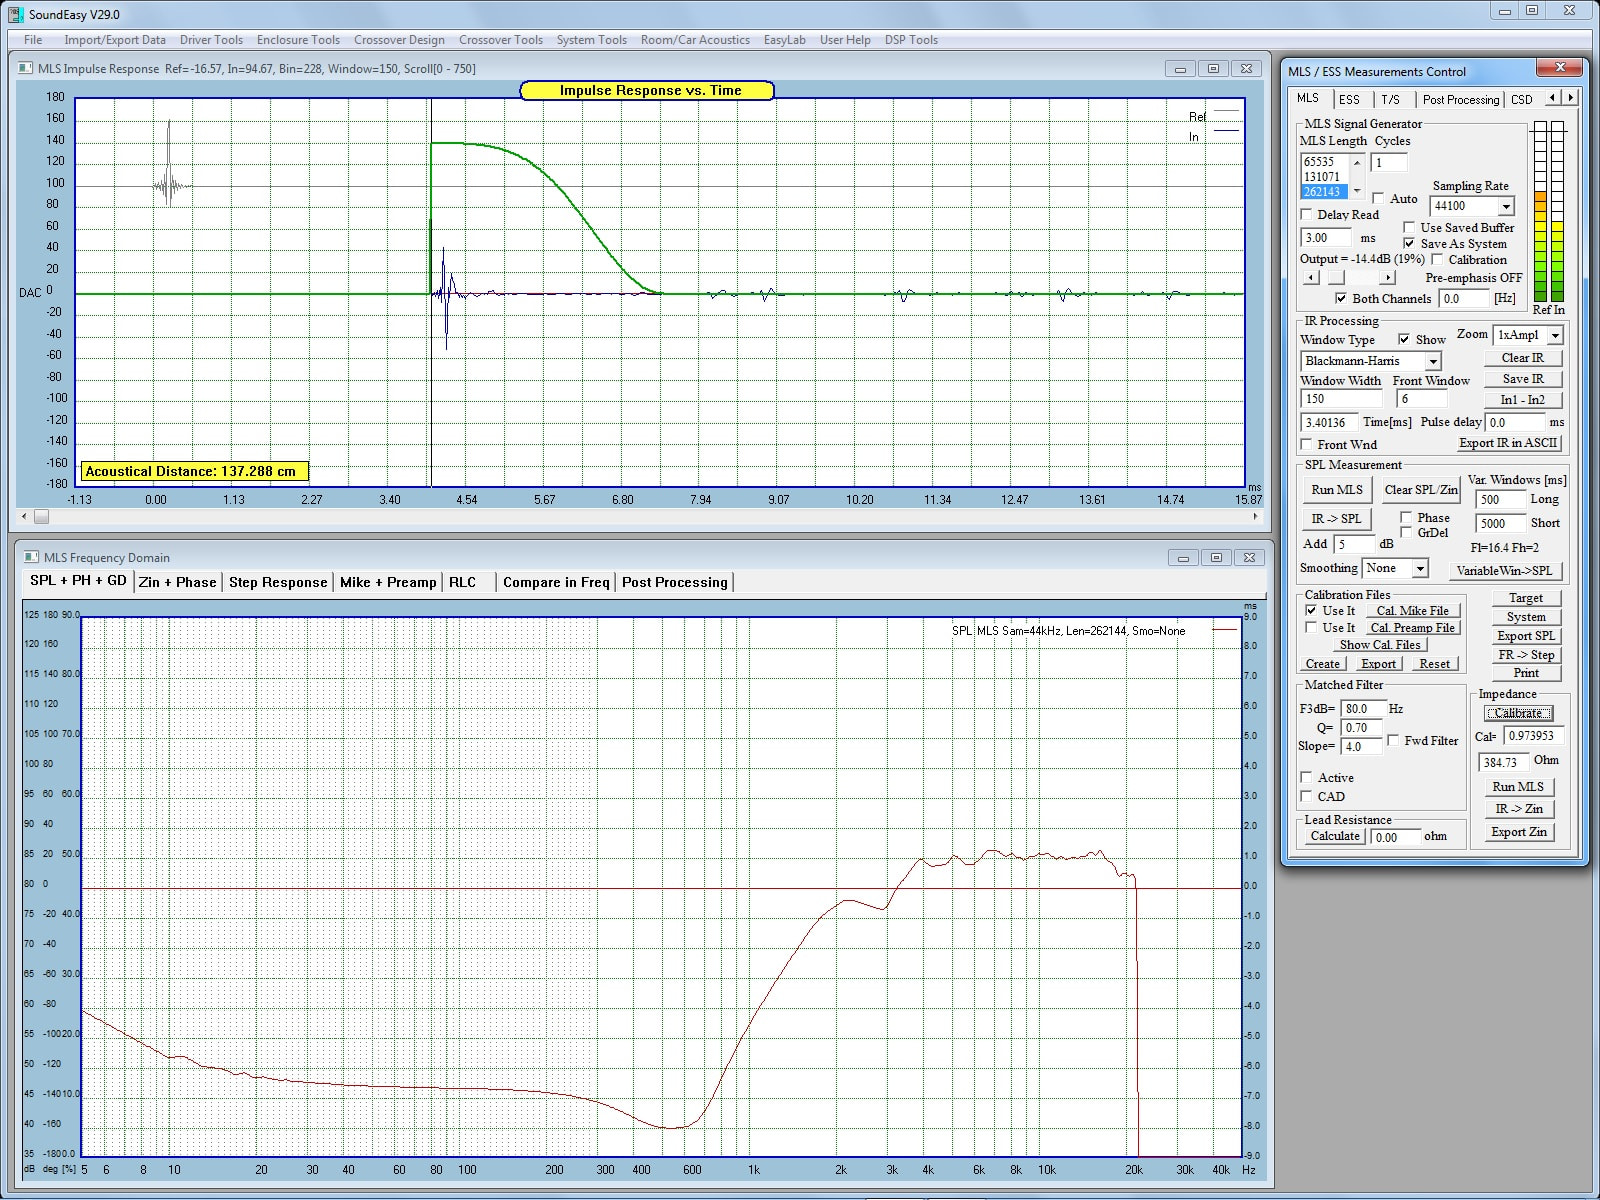
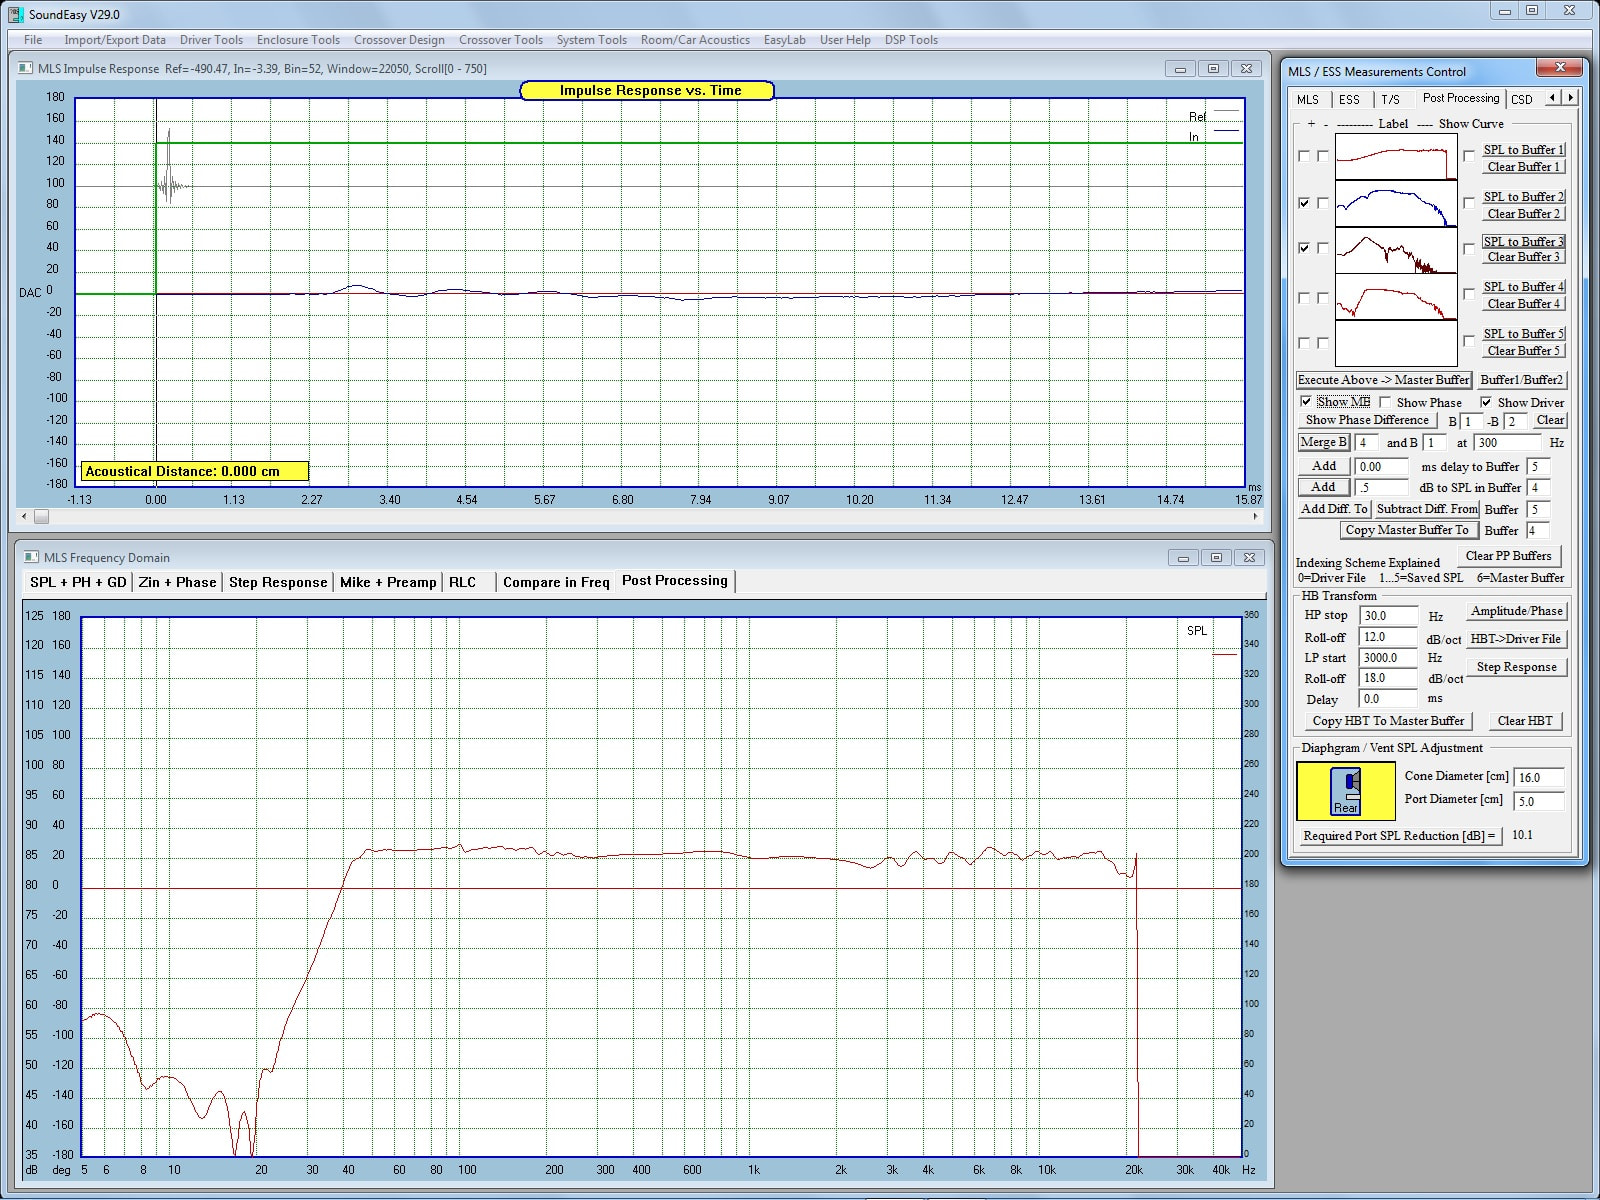
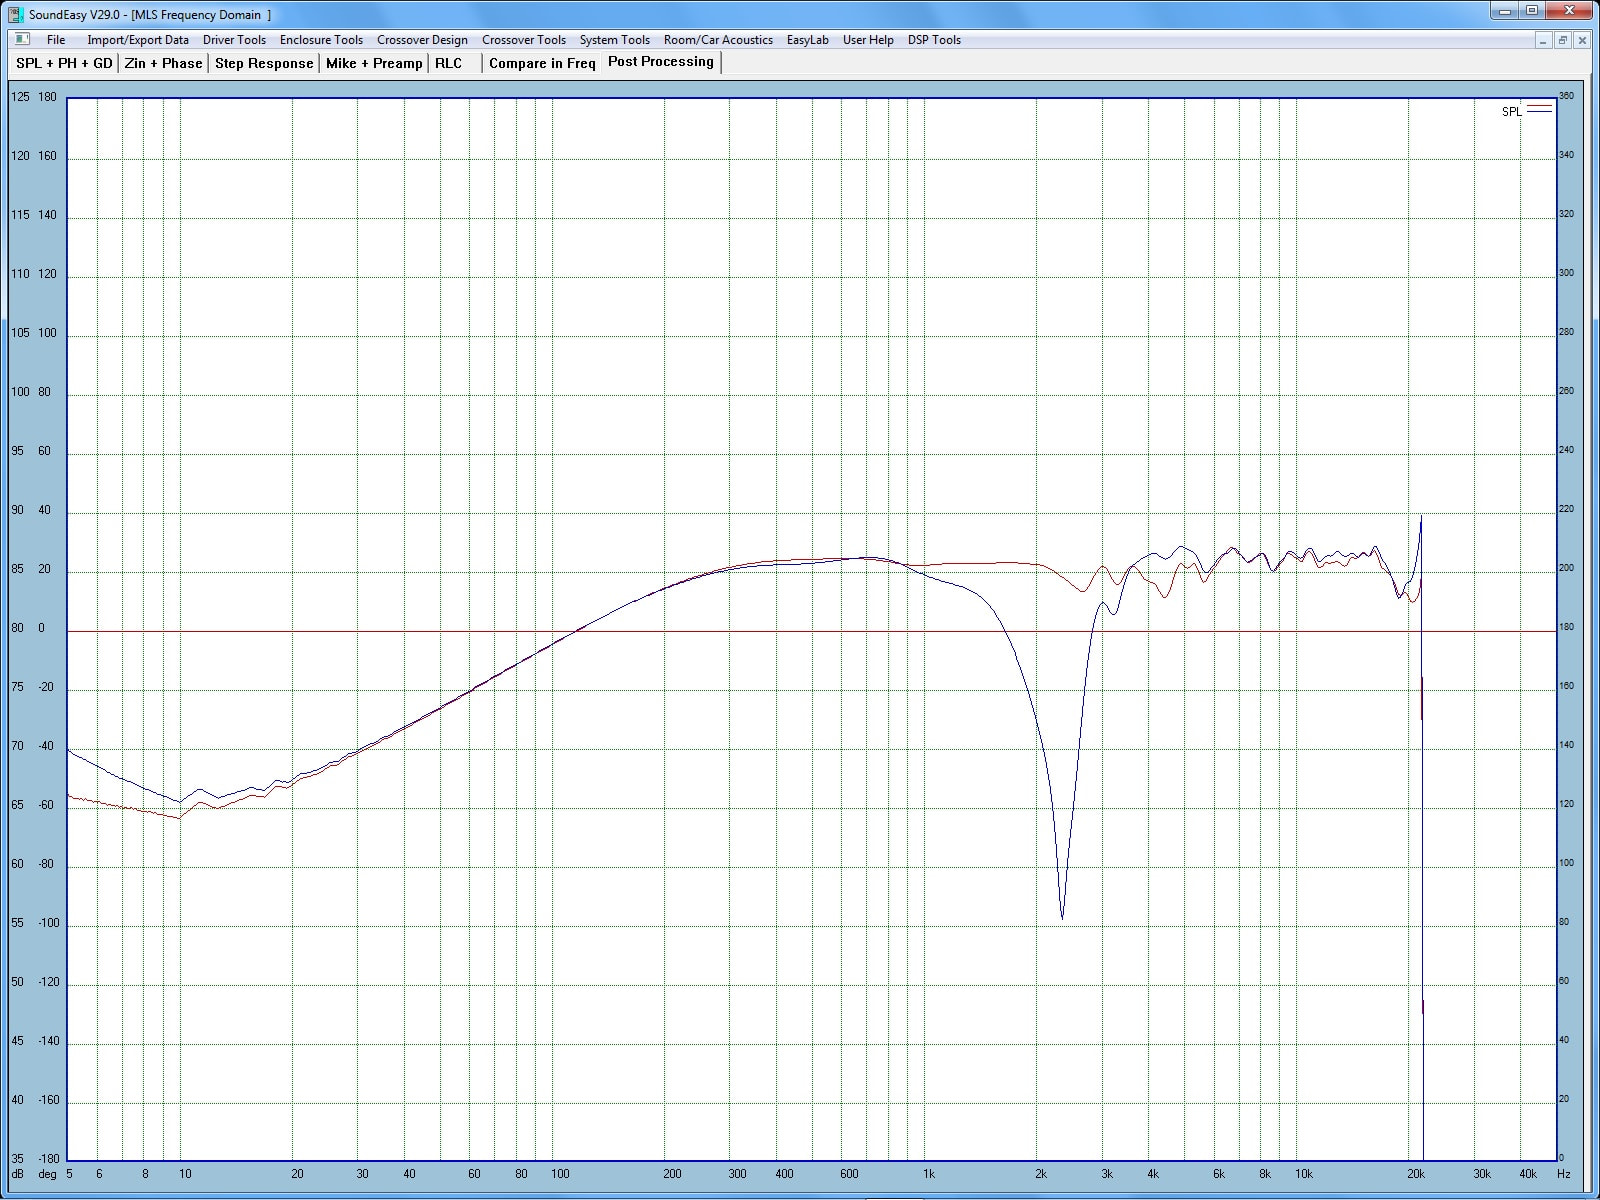
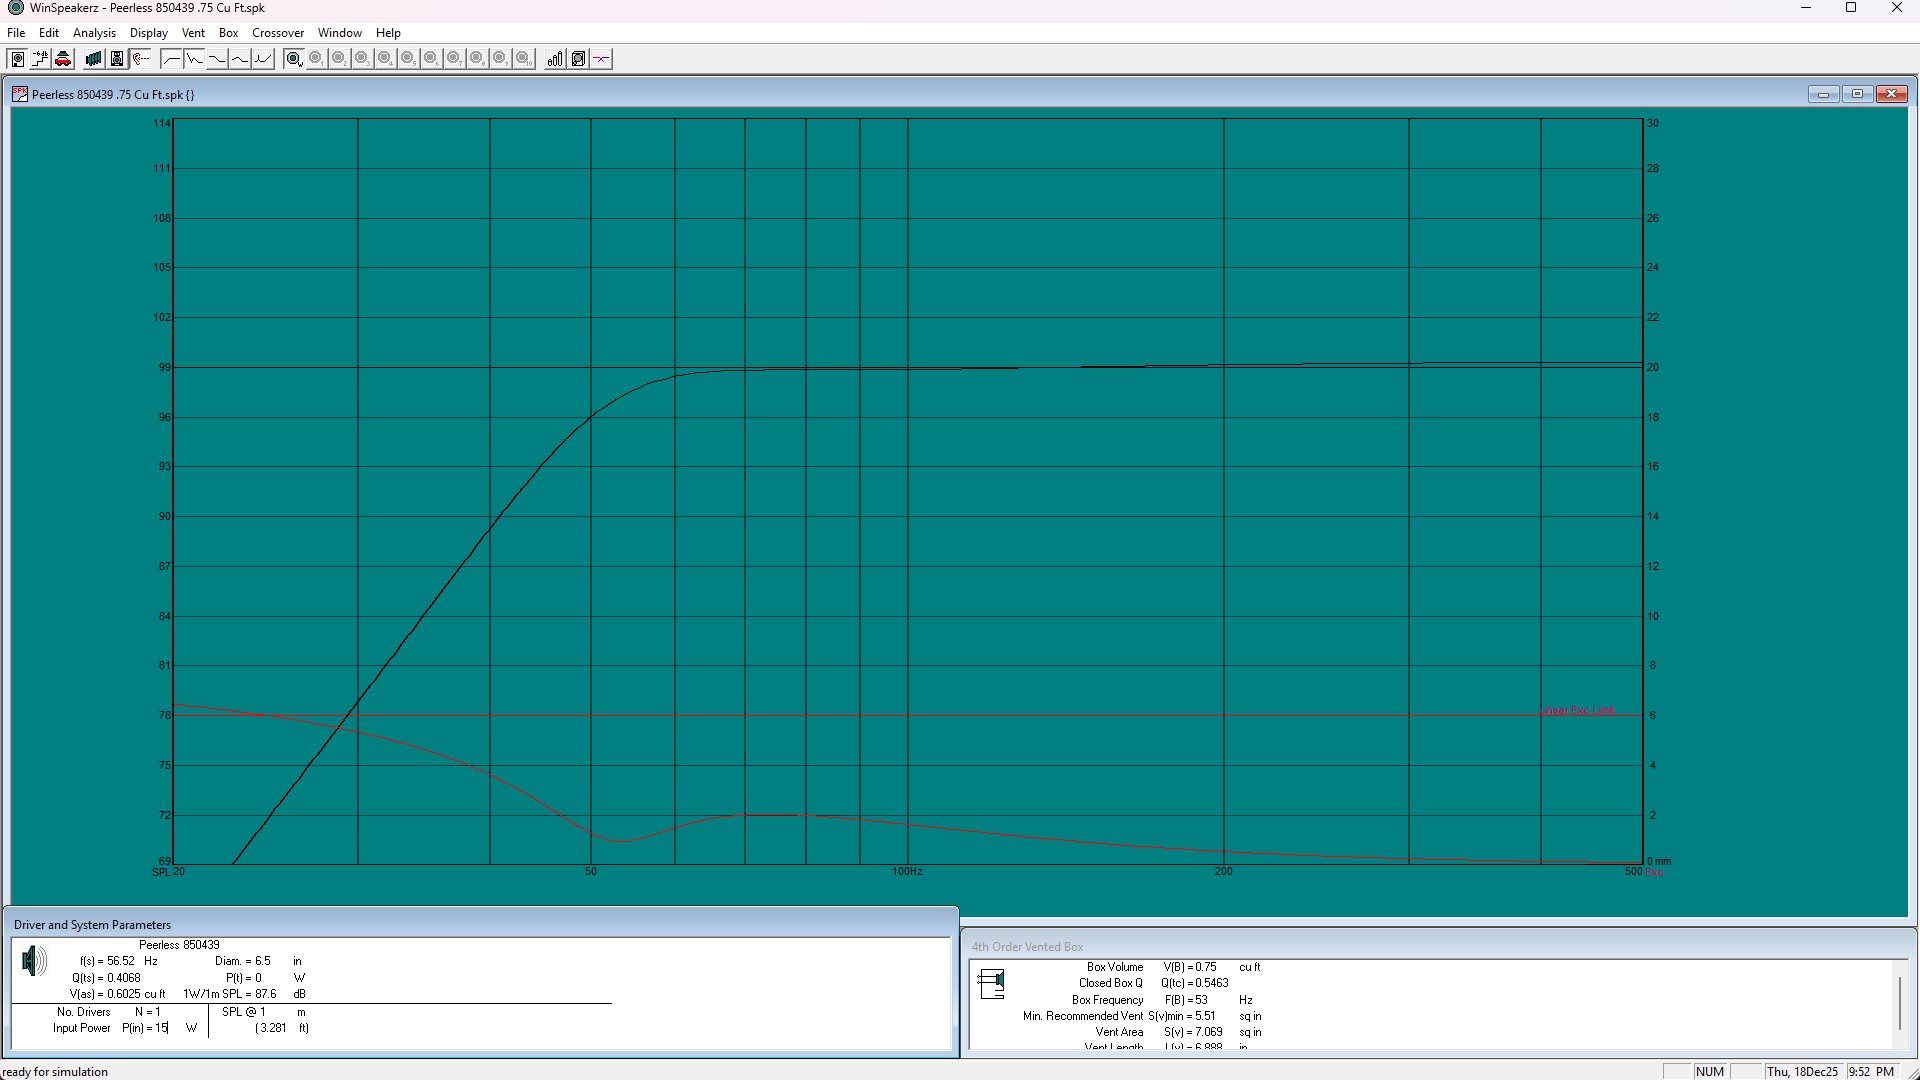
I next measured the tweeter FF response. You can see the effect of the crossover setting and I thought the response looked pretty good except for the dip around 3K.

3 Likes

Part 2

I opened the tweeter PEQ settings by clicking on the blue box in the “Tweeter PEQ” window. This window has a graph of FR and several lines of settings below it. I selected the Peaking filter type and set the frequency to 2750, The Q Factor to 8.85 and the boost to 6.45. I determined those setting by looking at the tweeter response and deciding that the middle of the dip was roughly 2750 and I wanted the width of the boost to run from 2000 Hz to 4000Hz and the boost to be 6.45dB. You can set these settings by filling in the appropriate box or by clicking on the dot on the graph corresponding to the color of the square on the line you’re working on. In my example you can click and drag the green dot to change the frequency and boost and click and drag the ends of the horizontal green line to change the Q. I would alter settings and make measurements until I was happy with the measured FR. I use SoundEasy for speaker measurement and would run it and SigmaStudio at the same time on my measurement PC and just bounce back and forth between the two.

From the manual:
Do not press the ‘add filter’ button while your KABD amplifier is connected to SigmaStudio. This will result in loud and awful sounds. If you need to add more bands of EQ/filters (using the add filter button), disconnect your KABD first.

This is the tweeter FF measurement with (red) and without (black) the tweeter PEQ adjustments.

![13 Tweeter FF Red Tweeter W-PEQ Blue|666x500]

I neglected to get a screen shot of the woofer measurements by itself. The response below 300Hz was flat and the gate time I used was accurate down to 300Hz so I could concentrate on setting the woofer PEQ settings which were essentially compensating for baffle step. In this graph of the woofer FF FR the uncompensated response is the red trace.

I opened the woofer PEQ settings by clicking on the blue square in the “Woofer PEQ” box. I used a combination of two staggered tone high shelf filters. These are shelving filters that can be defined by their frequency, Q and amount of boost or cut. Just like the tweeter PEQ settings you can fill in the values or click and drag the filter controls on the screen. You can see the results of these settings in the previous image where the woofer FF FR with EQ is the cyan trace.

I then took the woofer and tweeter measurements with PEQ and determined that I need to reduce the tweeter levels 5dB.

I went back to the “Crossover Control” window and adjusted the gain control for the High crossover to -5.

1 Like

Part 3

I was very happy with the final FF, woofer NF with port measurement.

![18 Final FR - FF with merged woofer and port 19 xNF|666x500]

The FF reverse null looked good too.

All of the changes that I made so far are temporary and will go away when the board is powered down. In order to make them permanent they need to be saved to E2PROM. I clicked on the Hardware Configuration tab to get back to the screen with the green USB. Then I right clicked on the bottom half of the ADAU1701 on the grayed out IC1 label. Clicking on the top half of the ADAU1701 button will give you a different drop down.

That pulls up a drop-down menu where I clicked on the Write Latest Compilation to EPROM line.

That brings up a EEPROM Properties box. The properties should match the properties in the manual. Mine matched so I clicked OK and a screen came up showing the download progress. With that complete I was ready to listen.

How loud can you go with 30 watts? Here’s the box sim for the woofer with 15 watts in. 99dB 1M without exceeding Xmax above 25Hz.

Originally, I had intended to use the KABD-430 on the pair of 3D printed speakers I brought to IowaDIY 2024. After getting it to work with the Dactives I needed another pair of boards. One for the 3D speakers and another one for other set of Dactives, since I built 2 pair. At the time PE was out of stock until January. I was able to find a Wondom JAB4 board at Aliexpress at the Wondom Store. This board is identical to the Dayton Audio board and was delivered for $10 less than the PE price. It shipped the day after it was ordered, there was a constant stream of tracking e-mails and it arrived in 10 days. The Wondom JAB5 is equivalent to the DA KABD-4100 board.

https://www.aliexpress.us/item/3256803095793775.html

You’re free do download SigmaStudio and load up the sample file I used and play with the controls.

4 Likes

Thanks for the detailed write up, Ron! This will provide a very good road map for people like me, who are attempting to understand, design and build a completely digital crossover. Sound quality at IowaDIY was excellent. I have always been impressed by speakers using this inexpensive SB Acoustics 19mm tweeter.

I have a question: Once the DSP board is programmed, it retains the xover topology in memory. So you do not need to haul a complete computer along to an event to make this thing work? Just extra amplifier channels. I can do the same type of xover in VituixCAD and then convolute the xover to Equalizer APO for a complete digital xover. But then I would need to haul lots of extra gear (laptop, external 7 channel soundcard, extra amp channels, cables) to an event to make it work. I think that that is what you did with the Cherry Pi’s. Would this be correct?

If you are asking specifically for the KABD board, then yes, you do not need laptop or the programming card for it to work once the XO is ready. The programming card is used to interface the KABD board to the laptop and sigma studio. That one card can be used to program multiple KABD boards

1 Like

Once you have saved the setting to Eprom you’re good to go. You don’t need anything but an input source and speaker cables to the drivers. The digital amps are on the board. It looks like you can chain them together for more channels.

Yes, the Cherry Pi’s do the crossover and EQ in the computer via Ultimate Equalizer software with a multi-channel sound card to drive external amplifiers. So I need to bring the computer, keyboard, display, all the cables and 6 channels of external amplification to play them.

I’ve done systems with the MiniDSP 2x4 HD crossover. You need a computer to program it and it does the crossover and EQ once it’s been saved, but you still need external amps. All you need is the MiniDSP, cables and amps to run a speaker system.

For some reason 2 of the images in Part 2 didn’t show. I’ve put them back in.

I’ve had that happen too. When posting pics, sometimes one of the images does not display. So I go into edit, delete the image that does not show, re-upload it, and then it suddenly appears.

Thanks

Ron, do you hear any hiss from that amp? I’ve seen some reports of hiss on the 4x100 boards when using high sensitivity drivers.

I don’t hear any hiss with the 4x30 board but high sensitivity drivers are notorious for showing noisy electronics. The 430 board and the 4100 boards have identical 97db SNR specs.

1 Like