Wow! I have seen a yoga ball used as a form for an outdoor bread/pizza oven build but not for something made from wood. Like this: https://www.youtube.com/watch?v=0Qno-XJwPKw
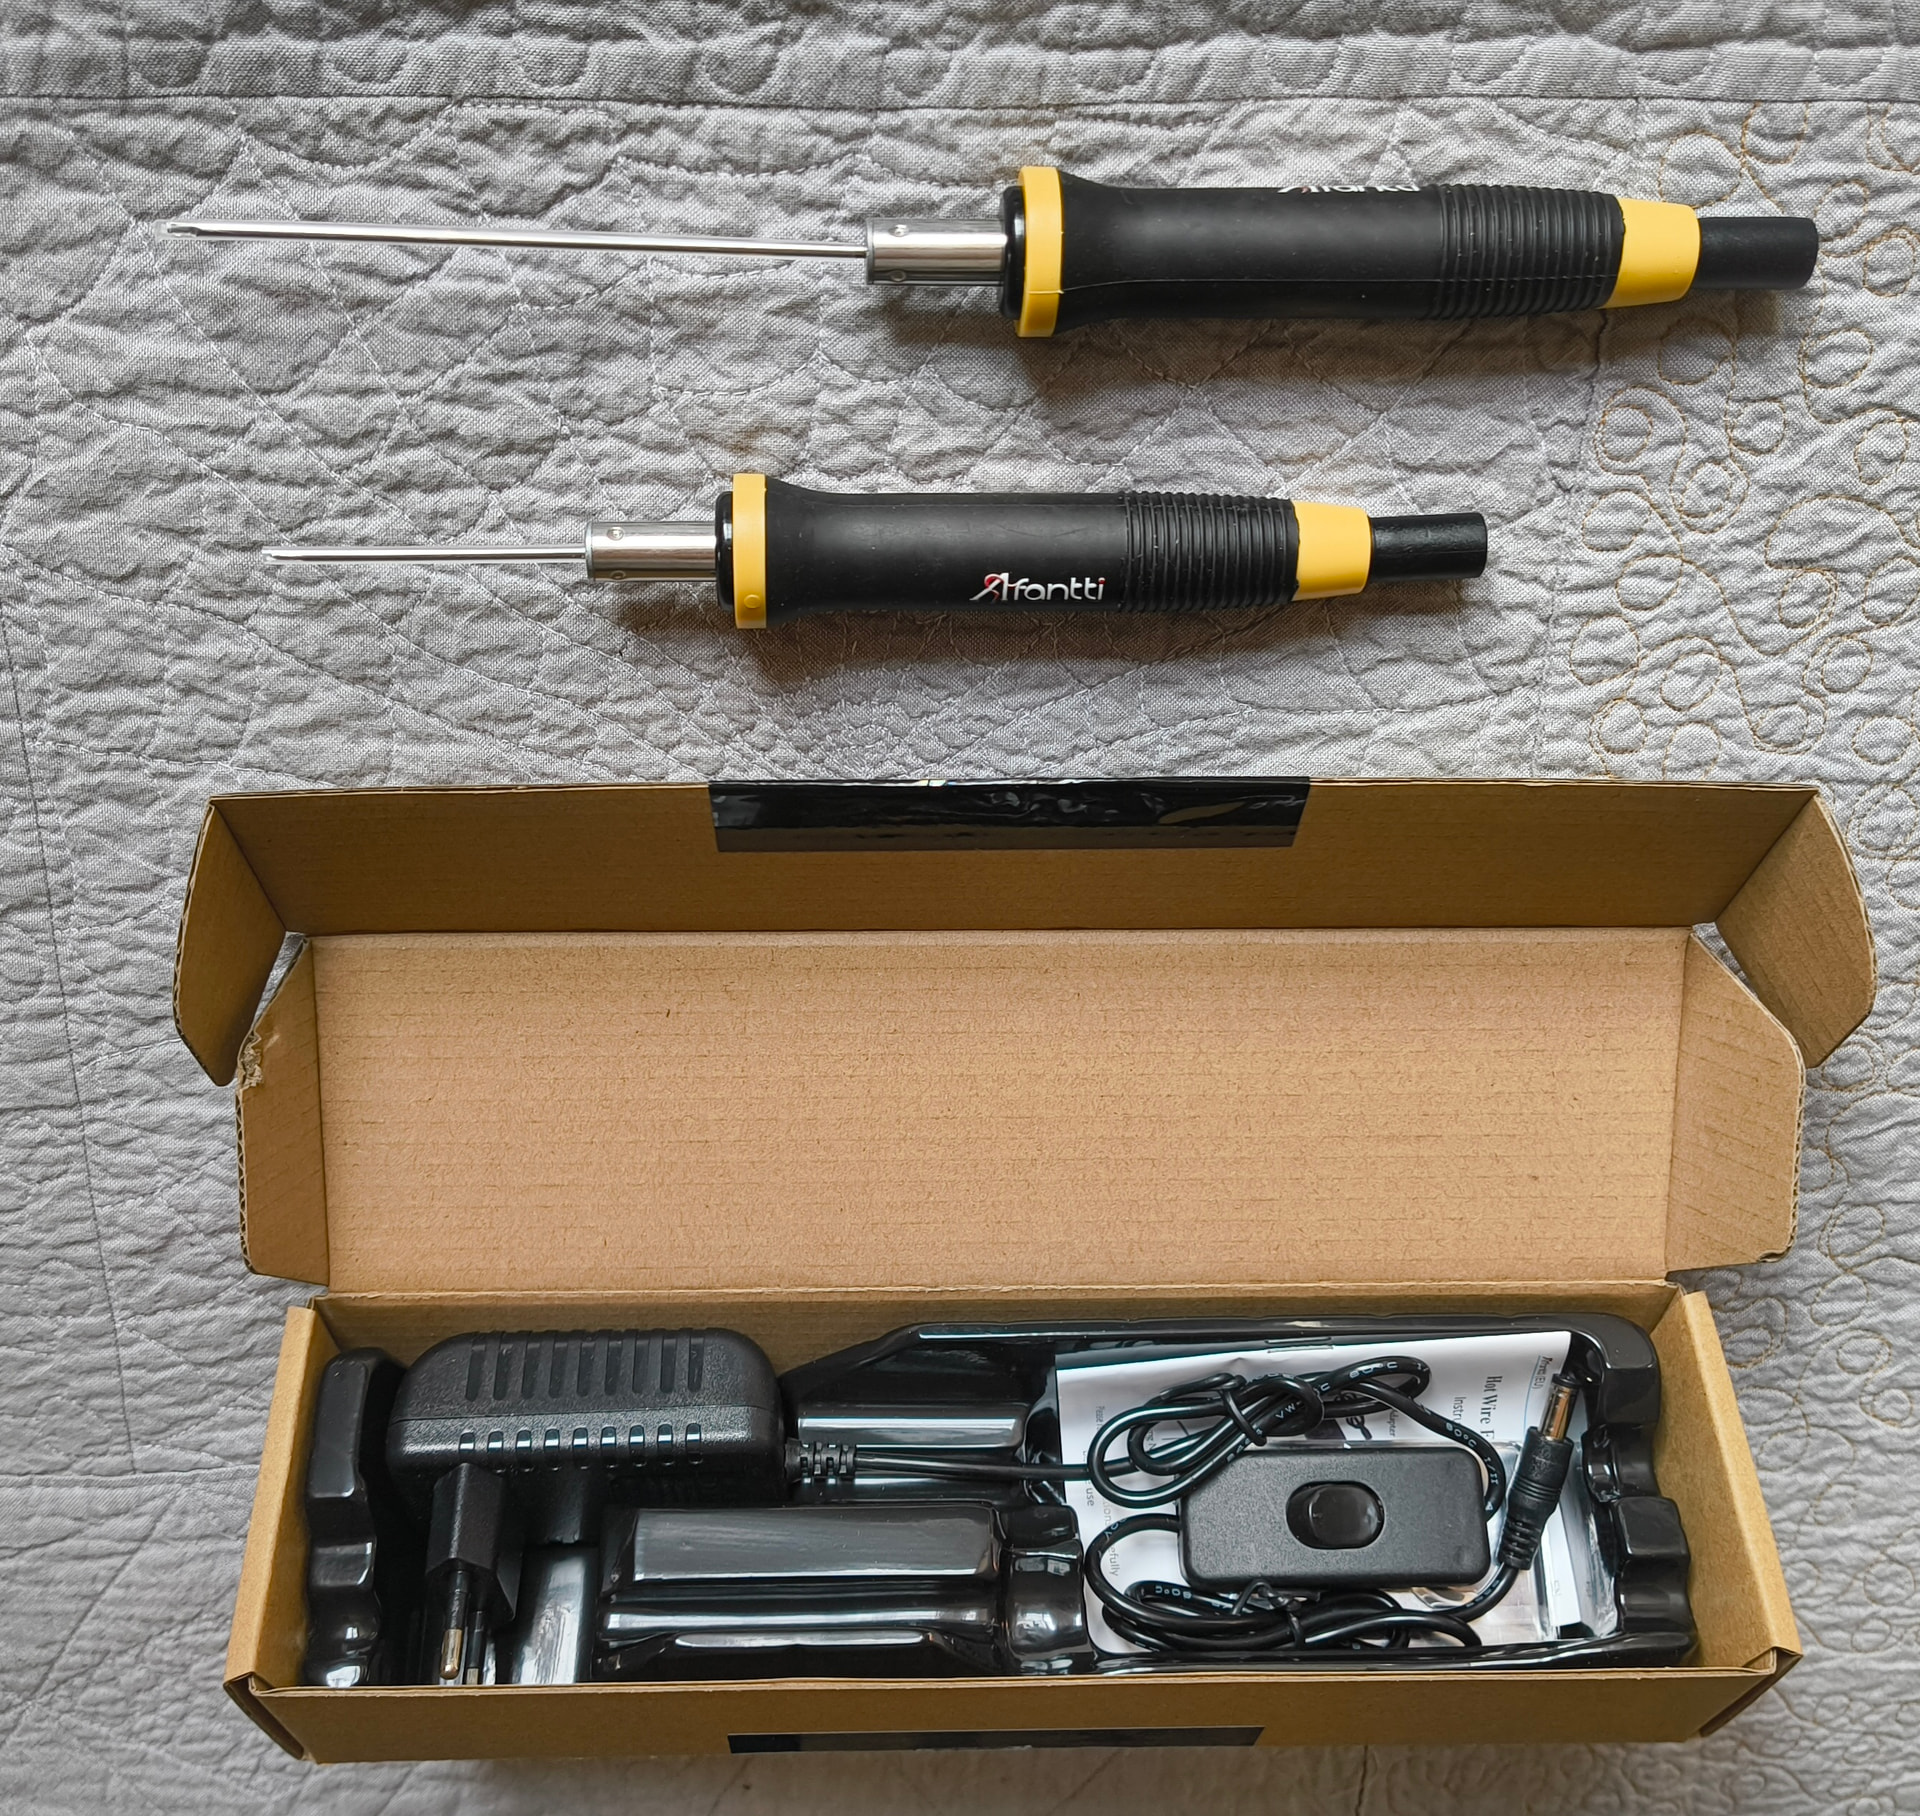
With the EPS sphere on the way, I ordered a hot wire knife. It sort of looks like an old school pencil soldering iron but with the rod and tip only 2mm in diameter. This heats up to 400C, and can just slice though foam and EPS by locally melting it. This should hopefully leave a clean edge to the cut.
To cut a round hole I will need to rotate the knife with respect to one of the hemispheres, around the apex. Could also rotate the hemisphere with the knife fixed. I will probably need to make up a lazy susan from two flat pieces of wood e.g. particle board or MDF with a center pin. I could mount the hemisphere to that so that it rotates. Then I would use a clamp to hold the grip of the hot knife and put that onto an arm. The idea is to position the arm and thus the knife, oriented properly and at the correct radius from the apex. Then you make a small hole, insert the knife, and turn on the power. The knife heats up in 10sec. Then you slowly turn while the knife cuts. With some luck, this will cut a nice clean, round hole of the correct size.
That sound interesting, do you mind taking a short clip of doing it and definitely lots of snaps! Are you planning on wrapping up the foam sphere in something, or is it going to be the stucture/walls of the sphere cab?
I looked at those plastic planter things. For the ones pictured above, there is also a flat section that it sits on. So flat front and back, spherical everywhere else. Could work. Not sure how thick the plastic is. They are usually not cheap if they are large. If I could check one out in person I might be more motivated to give it a try, but then those garden centers mark pots up by like 500%…
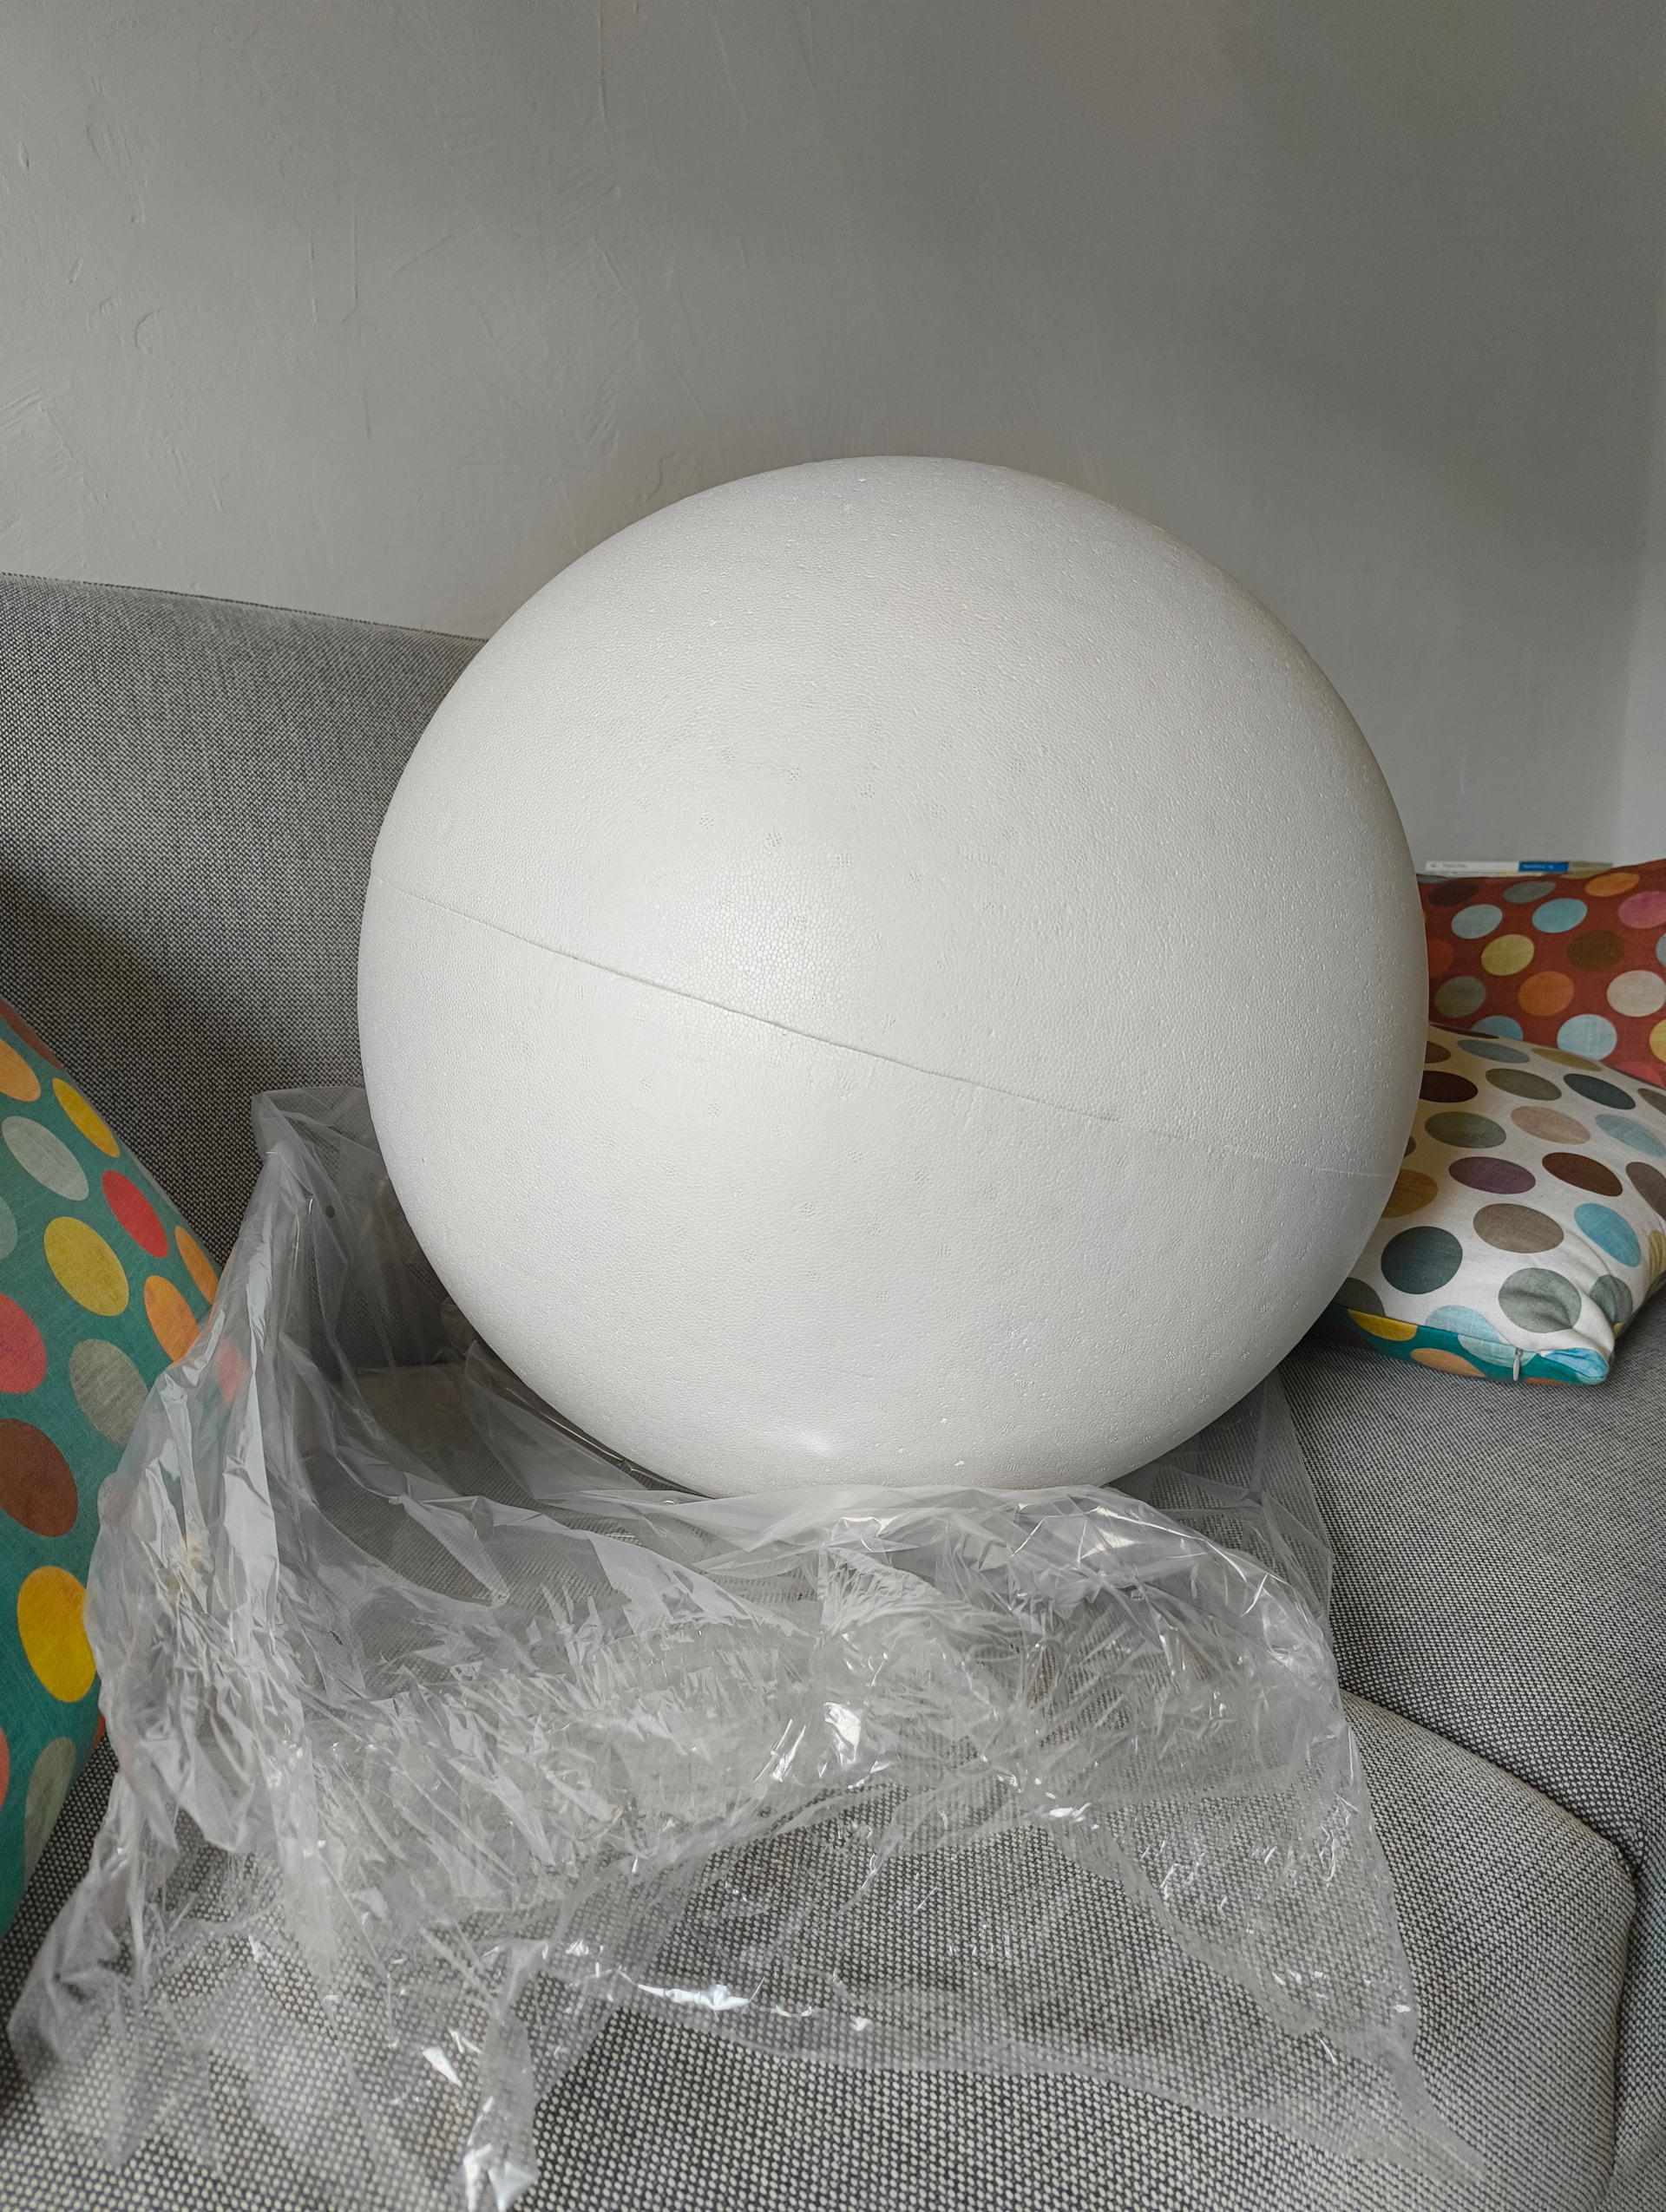
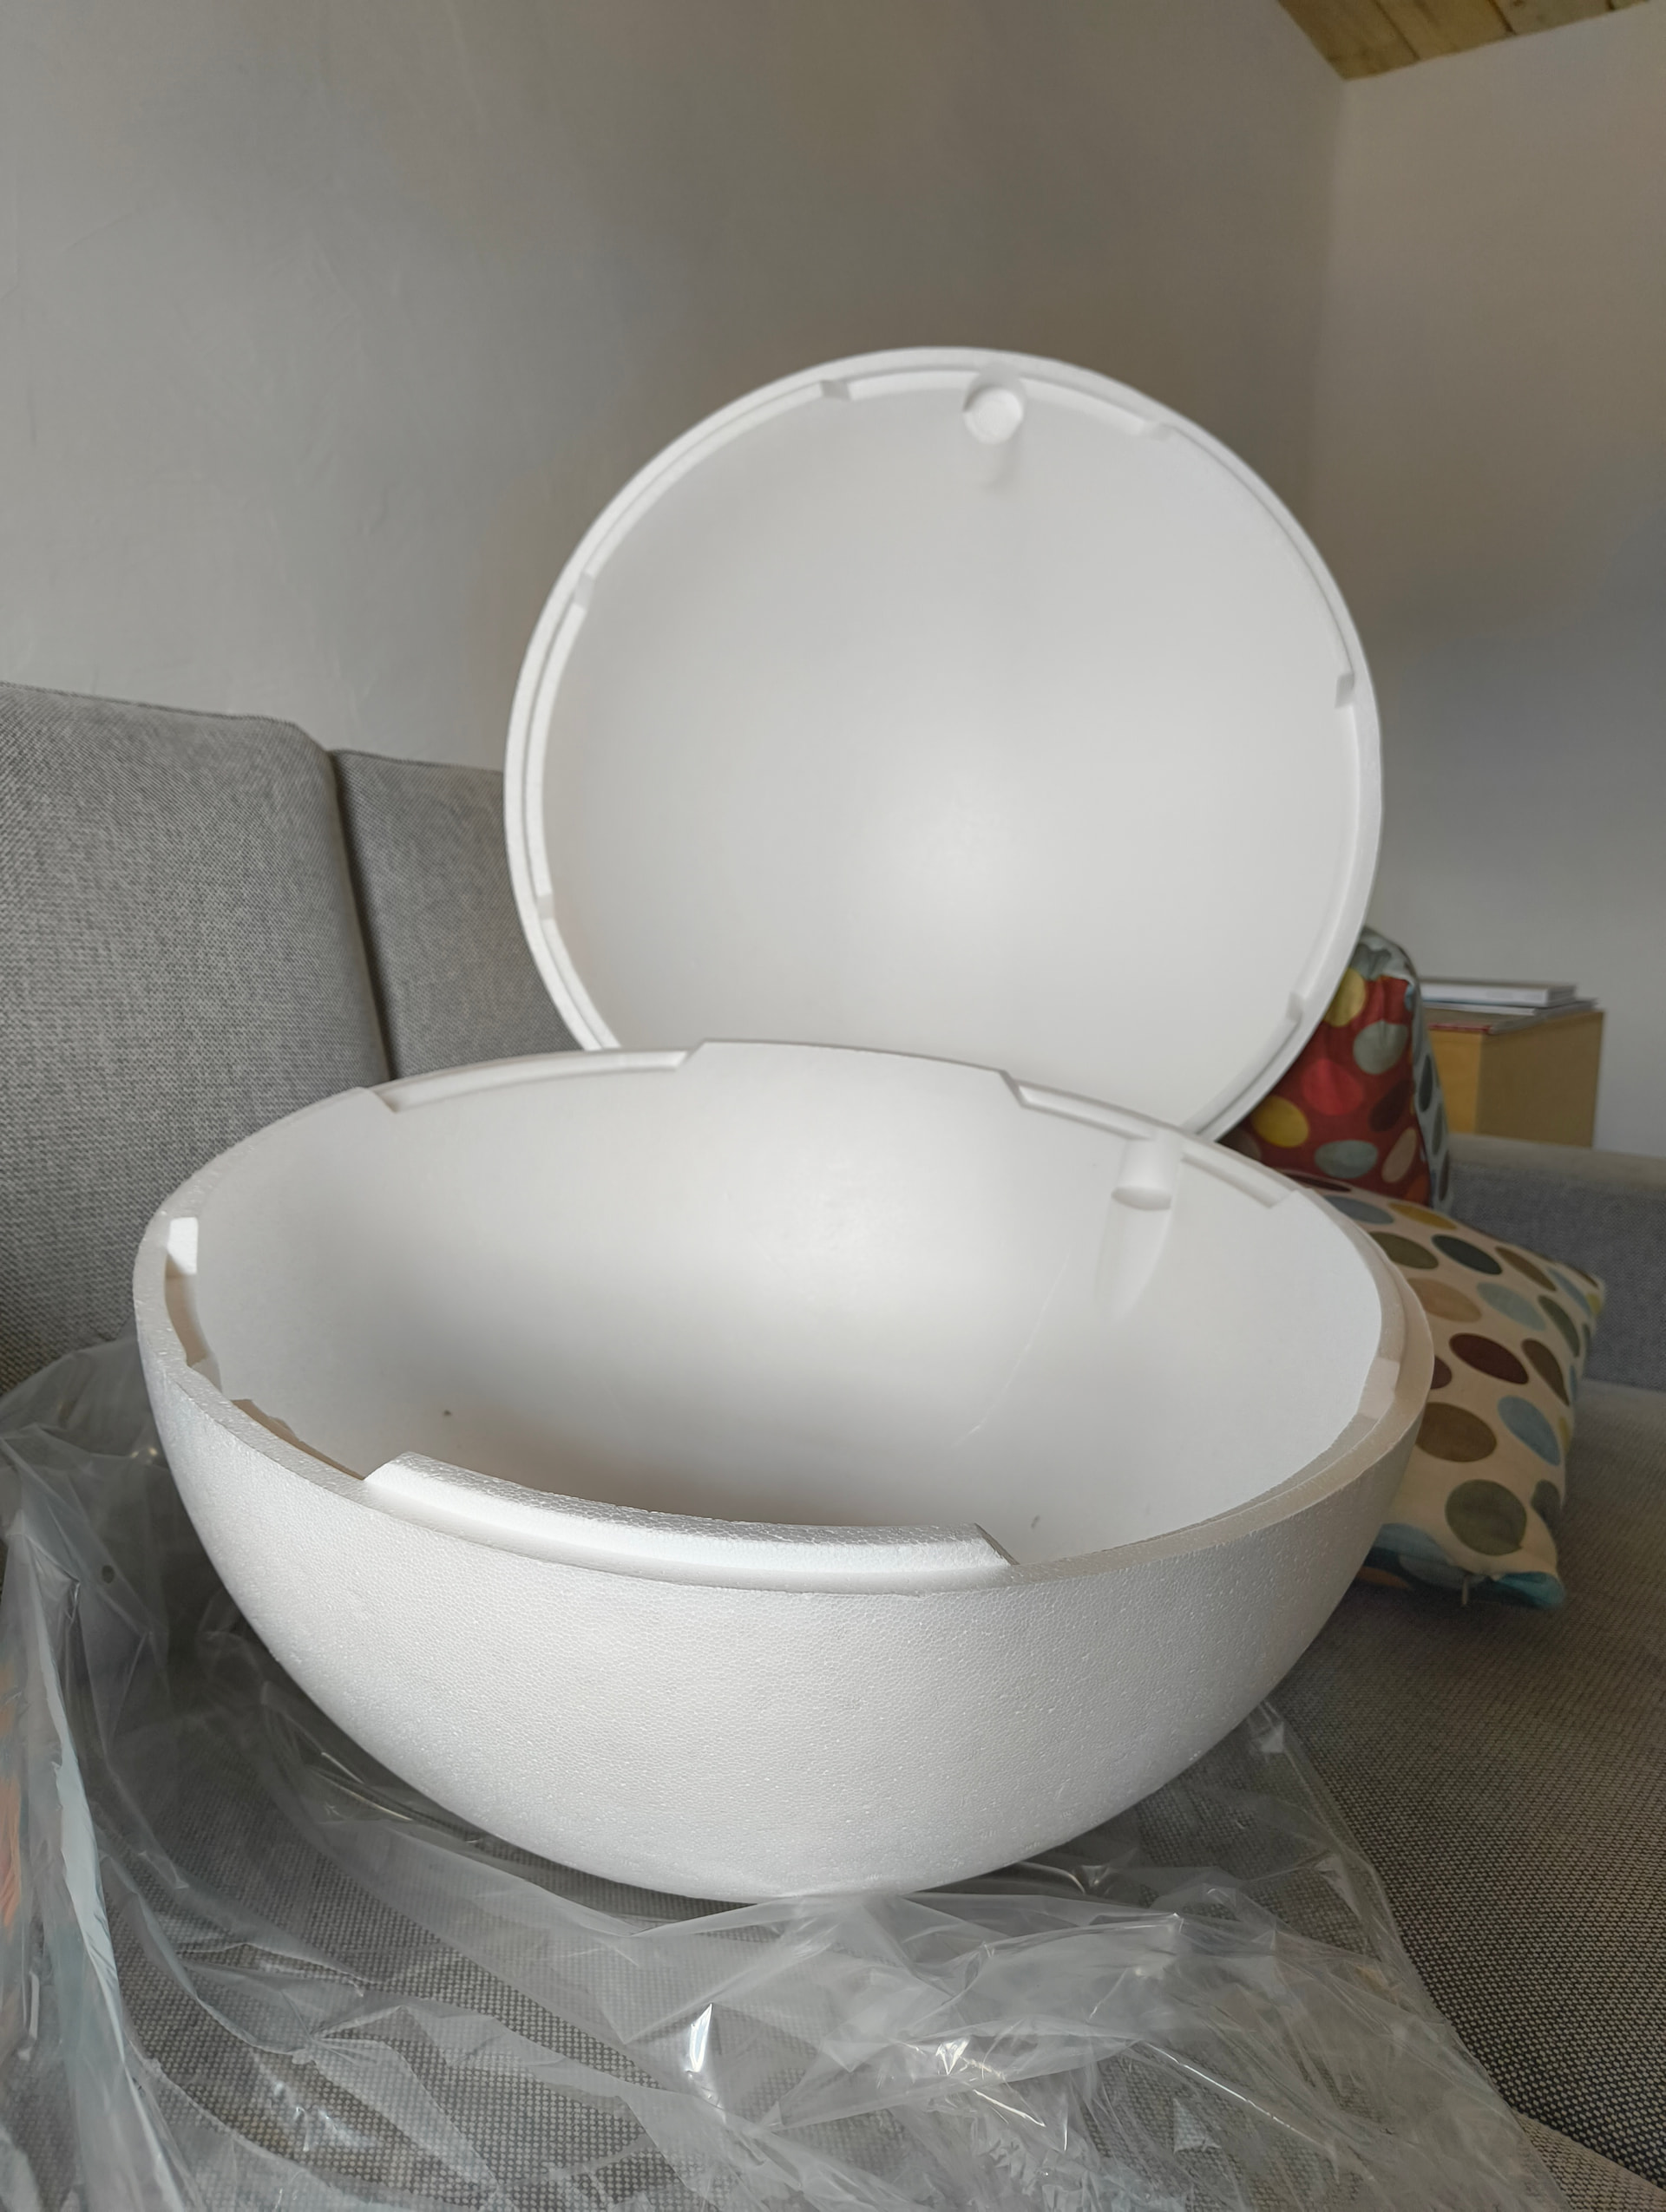
The 20” diameter PS sphere (as two halves) and the hot knife cutter have arrived. I know, this is like a stupid unboxing video or whatever, but here are some pics of that stuff.
The spheres are pretty decent, mechanically speaking. The two halves each have male tabs and female divots that mate when you assemble them together. Everything arrived in perfect condition.
I am still planning on how to hold the hot wire cutter tool over the hemisphere while rotating the hemisphere about the apex. I will need to go buy a few parts, so stay tuned.
What do you plan on using to give the PS a decent surface finish and some better strength? On its own it is extremely weak and won’t hold any thread type fastener. It also basically melts with any normal solvent based glues and finishing products. Limited to water based products?
I looked into the adhesive issue. Yes, its true that anything solvent based just melts the PS away. But it turns out simple wood glues like Titebond II bond pretty well to EPS. There are some other waterproof wood glue types over here that have been shown to work well without dissolving the material. These can also be applied as a primer layer.
What I hope/plan to do is cut (melt) a thru hole just a few mm in diameter wider than the driver mounting flange. Then I will use a router on some thin hardboard or similar material to make a ring (cut the appropriate size driver mounting hole, and make the OD a bit larger than the thru hole in the sphere). I will bevel the outside edge to better match the inside curvature of the sphere. Next I will glue the wood ring to the inside (remember, there are two hemispheres at this time so I can easily access the interior). For this step I plan to use some thicker adhesive to provide better gap filling. To increase the mechanical rigidity/stability of the ring, I will cut some braces from plywood that follow the curvature of the inside of the hemisphere and have a “finger” that will sit behind the wood ring and then glue these around the outside of the wood ring to the inside of the sphere.
The outside surface of the sphere can be primed with the wood glue and sanded, and then painted.
On the inside I probably need to glue in counterweights for the driver, which is not exactly a lightweight. If all goes well I will also glue in a bunch of damping material like foam padding. Have to figure out how to bring speaker leads into the thing, but that is down the road a bit…
Finally I will assemble the two hemispheres into the sphere, cleanup the glue joint, repaint that area, and then finish the outside. Then I can mount the driver and let er rip.
It looks like you are well into the process on this one and the sphere has merit IMO.
I think it was @ 2007 when I lived in Omaha and Wayne Wendel visited with his sphere’s. Curt Campbell did the crossover work.
The off axis response (tweeters from Oskar Wrondeng / me ) from the sphere’s was way better audibly. I didn’t measure. The intelligibility of the vocals was truly impressive at 80-130 degrees off axis. It was very impressive in this regard.
Wolf did mention above that Wayne wasn’t super interested in sharing how he built the sphere in the early years of this project. I concur with this sentiment, but Wayne’s sentiment MAY have changed now. He seems to be happily interested in long range rifle shooting / hunting lately.
Also, I feel comfortable sharing that Wayne discovered in early prototypes that mounting the woofer centered in the sphere was bad. Having the woofer offset on the flat portion of the baffle sounded much better. I suspect the internal axial cabinet modes being perfectly equidistant from the woofer contributed to this problem.
The sphere volume is much larger than what I need for the driver (it’s only doing midrange duty). So I am free to fill er up with lots of open and closed cell foam as needed. This should minimize the reflections and standing waves of an empty shell and will also damp the shell itself a bit so it will be a bit less acoustically transparent. For example, the first couple of inches of material on the inside of the sphere could be memory foam, carpet padding, or other closed cell foam that is more of an acoustic barrier. Then in the middle I can stuff it with dacron or whatever for adsorption.
I have figured out a very simple way to align and cut the thru hole in the polystyrene hemisphere. Earlier I thought I would need to make a jig to hold the hemisphere and, using some kind of lazy-susan type setup, rotate it or the hot knife that cuts the material in a circle in order to cut the correct sized hole. I lost a lot of sleep trying to think of how I would hold the hot knife steady while rotating it and how to build the whole contraption. But then I realized that there is a much simpler way!
Let’s think for a minute about the hemisphere. Whatever the dome is sitting on (some flat surface) is a plane - let’s call it the reference plane. Any parallel plane lying above the reference plane that passes through the hemisphere intersects it along a circle. The center of that circle will lie on the line perpendicular to the reference plane that passes through the apex of the hemisphere. This is the key info behind the new idea.
What I now plan to do is this: I first create a template from a scrap piece of thin hardboard by cutting a hole with my router that is the exact size of the through hole I want to make in the hemisphere. Next, I take this template and lay it on top of the hemisphere. I want to align it so that the exact center of the hole in the template coincides with the apex (top point) of the hemisphere. But given what I wrote above about the reference plane, all I need to do is make sure the template is perfectly parallel to whatever surface (e.g. plane) the hemisphere is resting on. I can do this using a digital angle measurement tool that I recently purchased, by first leveling the reference plane and then using the tool to adjust the placement of the template on the hemisphere until it is also perfectly level.
The template is now aligned and I will be ready to cut my hole. I hold the template down (or perhaps use some painters tape to keep it from moving), heat up my hot knife, and then run the hot knife around the inside edge of the hole in the template to cut that out of the polystyrene.
I can keep the template around in case I want to make the exact same cut in additional PS hemispheres, e.g. at least a second one to make a pair of loudspeakers.
would suggest you use some risers, might have to shim them, so you can lay the template flat and parallel to the table surface on which the hemisphere is resting. otherwise a small know and oyu are out of alignment. use wood block or whatever (3D printer is really helpful), final shim after measure measurement, stick everything so that the riser is one peice, clamp the top template to the riser, make sure everything looks good, then use the knife.
It’s just me, but i can never hold a measurement steady unless everything is clamped down tight!!!
And, if you can make a collar for the knife which is a bit wider than the fat partof the handle where the hot metal part is coming out, then it will be easire to keep it perpendicular to the template, since it will be riding the template o nthe collar, just like a handheld trim router.